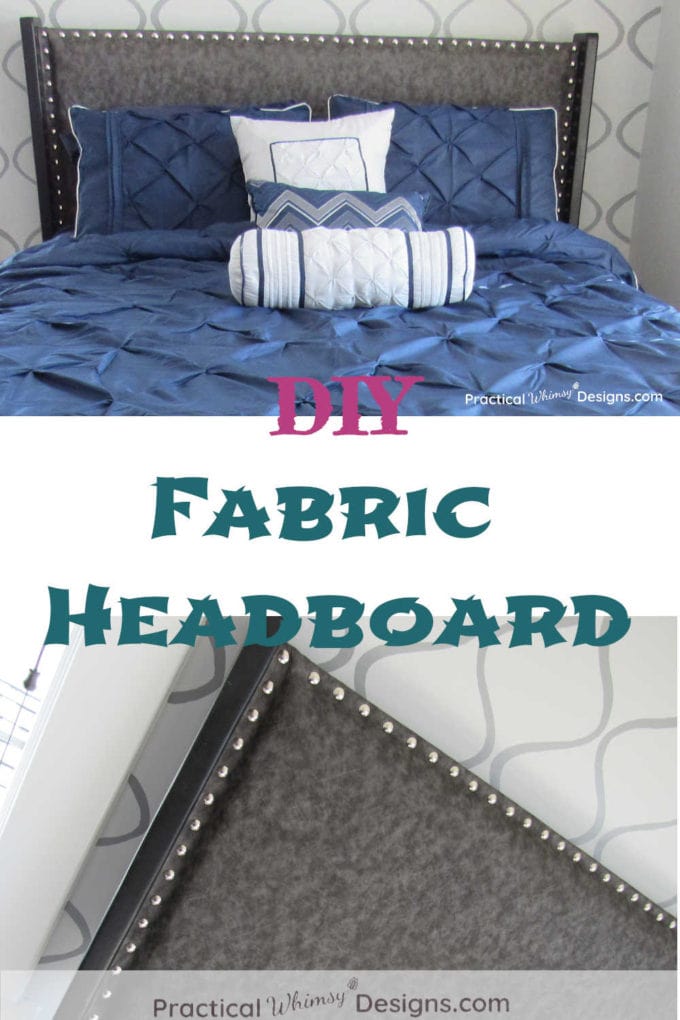
A DIY fabric headboard is a great way to add your own personality to your room. Check out this tutorial to make your own.
Our master bedroom received a major overhaul and we are changing up our personal bedroom style to a more sleek and modern look. That means that our old sleigh bed needed a makeover.

Not only was the sleigh bed too big for our new, but smaller room, it also was a cherry color. We needed to magically change it to a dark bronze and shrink our bed.
So with a wave of our magic wand our bed transformed into a………Just kidding.
We transformed our bed with a DIY fabric headboard, a couple of boards, and some paint and now I’m giving you the secrets on how to make a fabric headboard of your own.
This post contains some affiliate links for your convenience (which means if you click a link and make a purchase I will earn a small commission at no extra cost to you). Please see my disclaimer page for more information.
Materials You Need:
- A Headboard (We reused our bed headboard, but you can also use a piece of plywood cut to size. Our headboard is 60 1/2″ x 27″)
- Fabric (I purchased mine at Joann Fabric, but this fabric from Amazon looks similar.) Get enough to overlap your headboard by at least a few inches. Remember to account for the extra measurement of the foam.
- Upholstery foam (we used a 1 inch thick piece, remember to get a big enough piece for your headboard)
- Quilting batting (enough to cover the headboard and foam and wrap to the back)
- Spray adhesive
- Staple Gun and Staples
- Large Upholstery Tacks
- Hammer
- Fabric Scissors
Steps to Make a DIY Fabric Headboard
Step 1: Measure and cut
Measure and cut the foam to fit the headboard. We cut ours about an inch back from the sides and the top because we knew we were putting upholstery tacks along the edges and we didn’t want to push them through foam. So keep in mind the style of your upholstered headboard and cut your foam to fit.

Then cut your quilting batting and fabric so that it overlaps the edges of your headboard and foam by at least a few inches. We chose an upholstery fabric that has a fake leather feel. It matched the chairs we purchased for our room almost perfectly so it was kind of a no-brainer. A thicker fabric will definitely be easier to work with when making your fabric choice.
Tip: A heavier curtain can also be great for using over a headboard and cheaper than buying fabric by the yard.
Step 2: Attach the foam to the headboard
Now, the last thing you want is for your foam to shift while you are trying to wrap your fabric onto your headboard. To keep this from happening, spray the front of the headboard with spray adhesive and stick the foam onto it. This will keep your foam from sliding around while you are wrapping the headboard with fabric.
Step 3: Staple on the quilting batting
Next, use a staple gun to staple the quilting batting to the headboard. We laid the quilting batting flat on the floor and then set the headboard, foam side down, on the top of the batting. To keep your batting smooth and flat, wrap the batting around to the back of the headboard and start with a staple in the center of either the top or the bottom of the headboard. Add more staples every inch or so, working left and right, stapling the edge until you have stapled the whole length. Then pull the fabric across to the other side and do the same thing. Use the tension created by the secured side to keep the fabric taught and smooth it out with your hand as you staple.
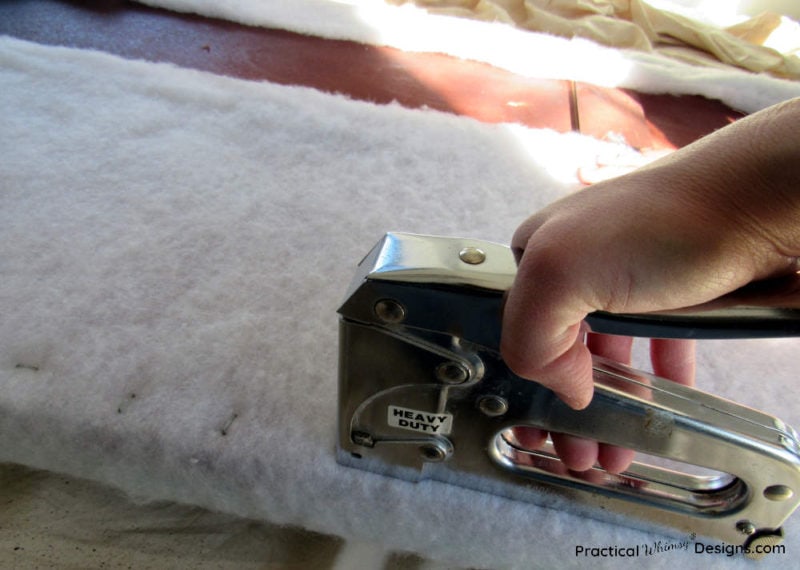
It is easier to staple onto the back if you keep the foam side down. However, this does make it a lot harder to keep everything smooth. Try your best to get it as flat as possible.
Because we added sides onto our headboard and we are not hanging our headboard on the wall, we did not staple the quilting batting on the sides, only the top and the bottoms of the headboard. If you are planning to hang your headboard, then secure your batting on the sides of your headboard as well, using the above method.
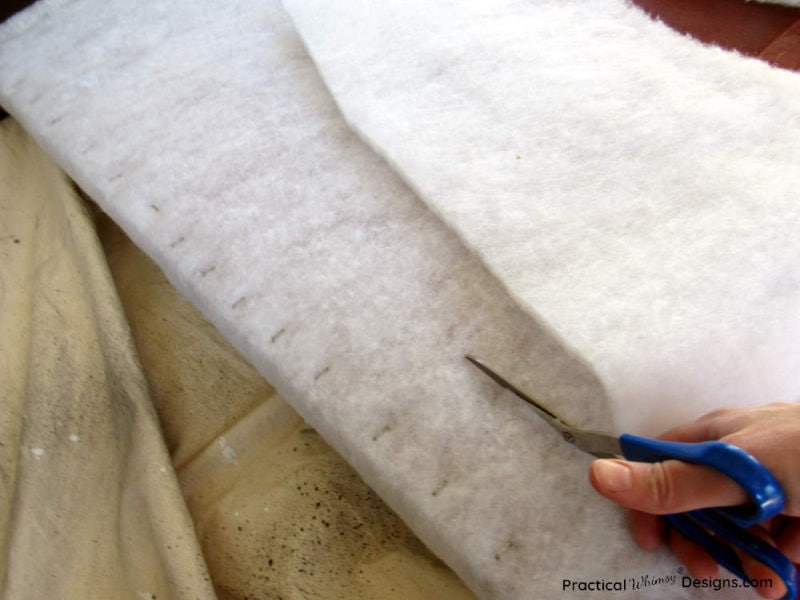
Trim off any extra quilting batting.
Step 4: Attach the Fabric
We decided our DIY fabric headboard was going to have decorative upholstery tacks to match the chairs we purchased for our master bedroom.
(If you are NOT going to use upholstery tacks, use the same method that you used for your quilting batting and staple your fabric to your headboard.)
The form you have selected does not exist.
How to attach the fabric using upholstery tacks:
1) Tack the sides
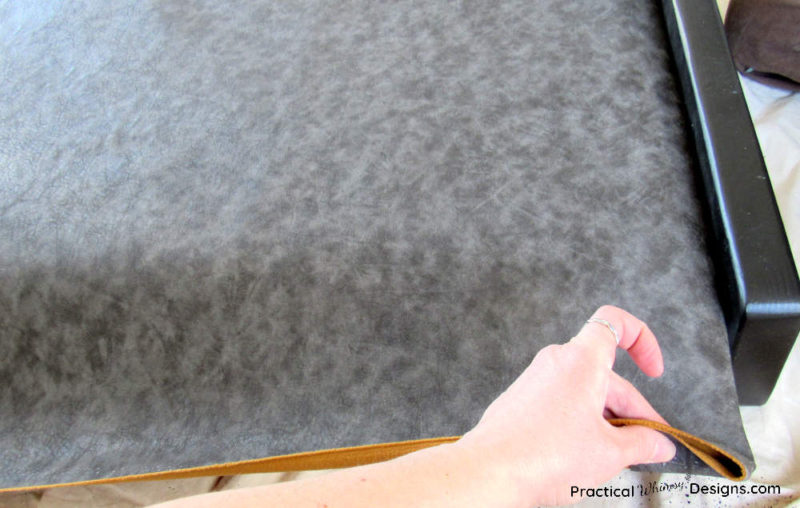
With foam side up, lay your fabric across the headboard.
If you have a frame on your headboard, fold the fabric over a couple of inches on the frame side to create a finished edge.
On the first side you attach, hammer a tack on the top corner. Determine your ideal spacing. We spaced ours so that there was about an inch of fabric between each tack edge, however, this spacing is up to you and the look you are trying to achieve.
Continue hammering tacks through the fabric.
We used a paint stick to keep our tacks an even distance away from the edge and we marked little hash marks on the stick to act as our guide as we hammered.
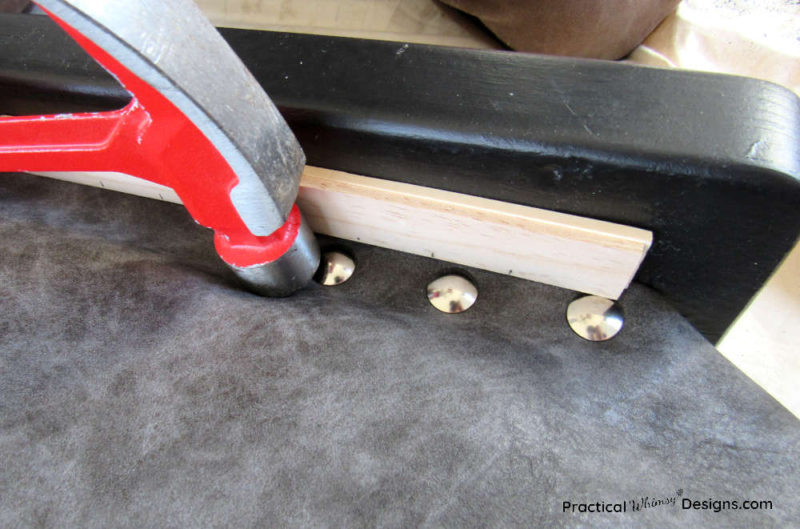
Note: It’s easy to bend the tacks if you aren’t careful. Try to keep the hammer and tack straight when hammering so the end doesn’t bend over. You can pre-drill the holes but the fabric can get stuck on your drill bit and tear. Either method takes patience and care when securing the tack.
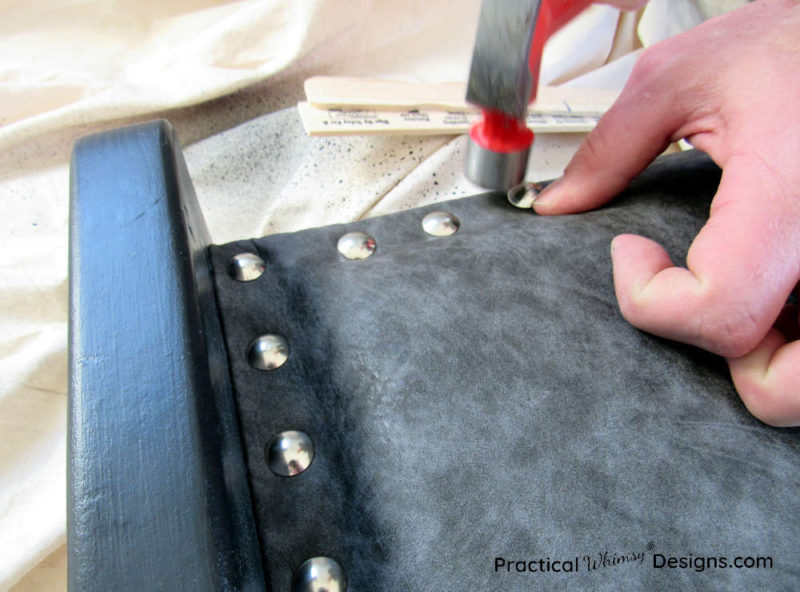
After you finish tacking the fabric on the first side, start on the opposite side. Take your hand and place it closest to the finished tacks. Slide it down the middle of the headboard towards the untacked side. Pull the fabric taught with the other hand while you are doing this. Continue working the fabric with your hand, smoothing it from the tacked side towards the open end.
Once again, fold the end of your fabric under to create the finished edge and pound your first tack in the center of this side.
Note: Your first tack may not be exactly in the center. You need to measure across the headboard and pound the first tack straight across from the one on the other side. Otherwise your tacks will not line up and will not look symmetrical.

Keep pounding in tacks to secure the fabric, spacing them evenly. Smooth the fabric as you go to keep it from bunching.
Remember to check your work periodically to make sure that the tacks on the opposite sides are even with each other so that they don’t look off to your eye.
2) Tack the top and bottom
Once both sides are done, move on to the top and bottom. Keep the fabric tight as you hammer tacks along the top and bottom edge. At this point we were mostly able to eyeball where our tacks were supposed to go, though we did use a marker to mark the general center of our tack, so we could make sure they were evenly spaced the whole way.
3) Trim and staple the fabric
Once you are done with all of the tacks, turn the headboard over so that the finished side is face down.
Trim off any extra fabric.
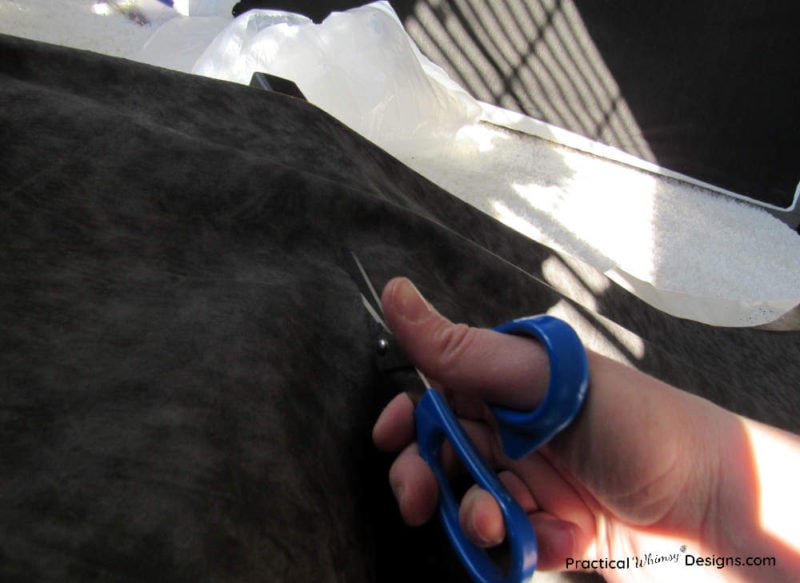
Pull the fabric around to the back and turn the edge under to finish the edge. Staple it to the headboard with a staple gun.

Set Up Your DIY Fabric Headboard
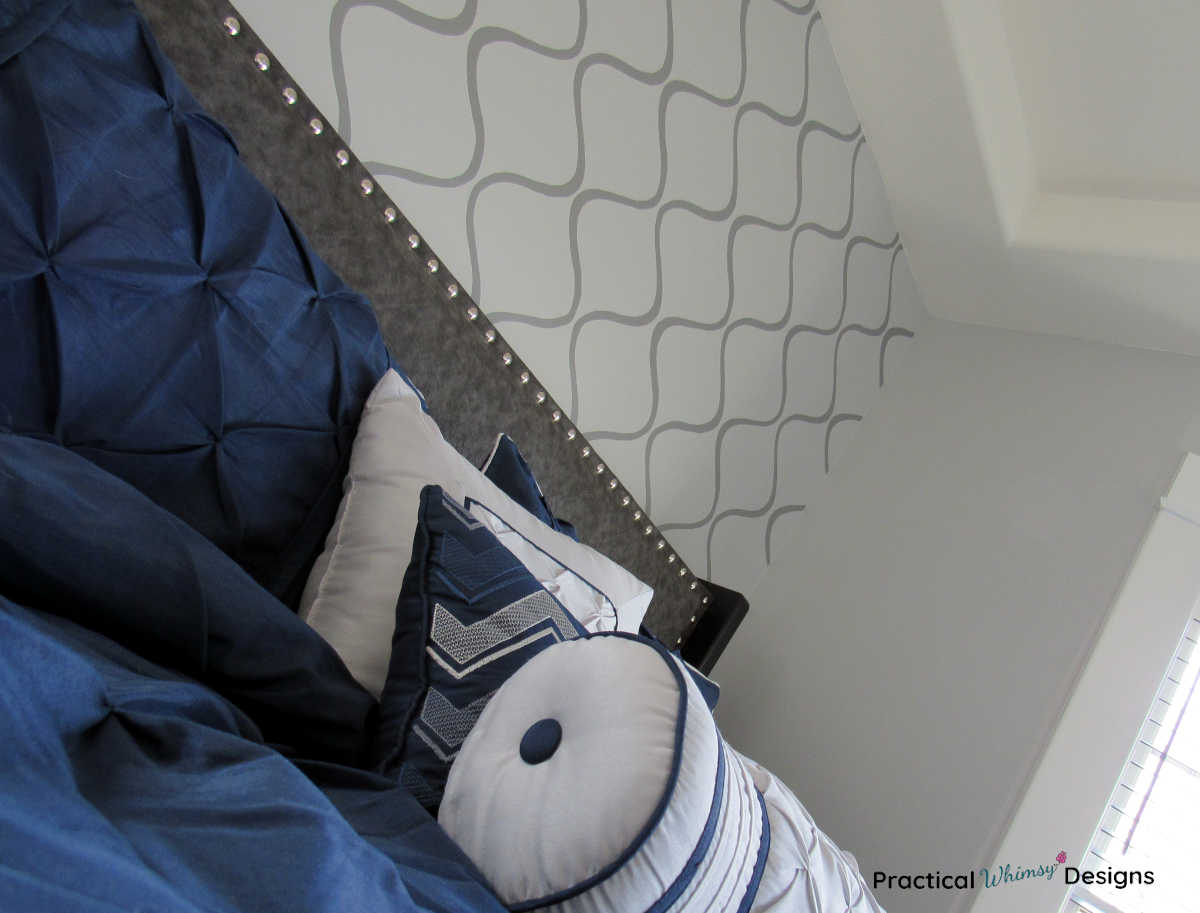
Here’s what the finished headboard looks like.
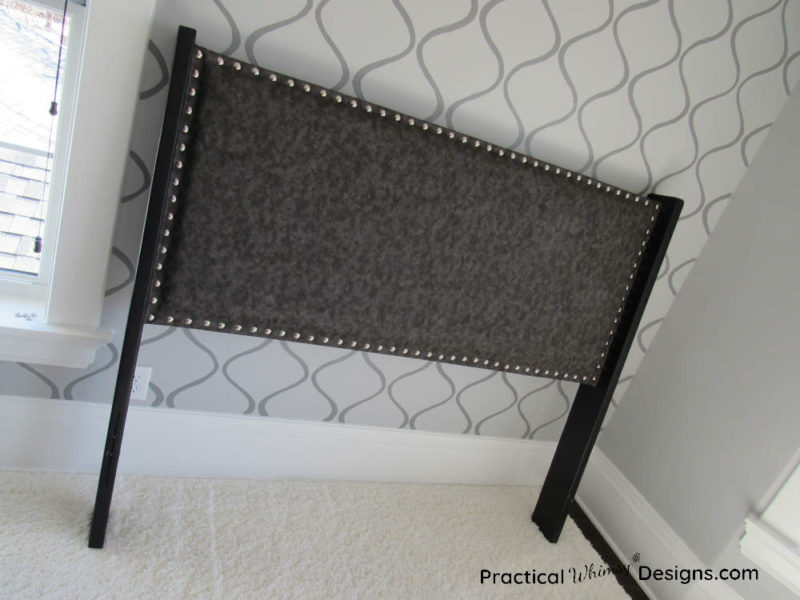
And here is what it looks like after we put together the frame and put our matress and bedding on it.

What do you think? Are you ready to try a fabric headboard of your own?
Want to remember this idea for later? Save it to your favorite DIY Pinterest board.
Want More Great Ideas? You Might Like These..


Are we friends on Instagram?
Follow @PracticalWhimsyDesigns to see more
behind the scenes projects
Thanks for sharing this DIY headboard, Erin! It was very through and oh so helpful. 🙂
Thank you for the encouraging words.
Great Job, Erin!
Thank you so much!
This turned out so good! Simple and elegant, pinned. I need to try this!
Thank you! It completely changed the look of our bed and I’m so glad that it inspires you.