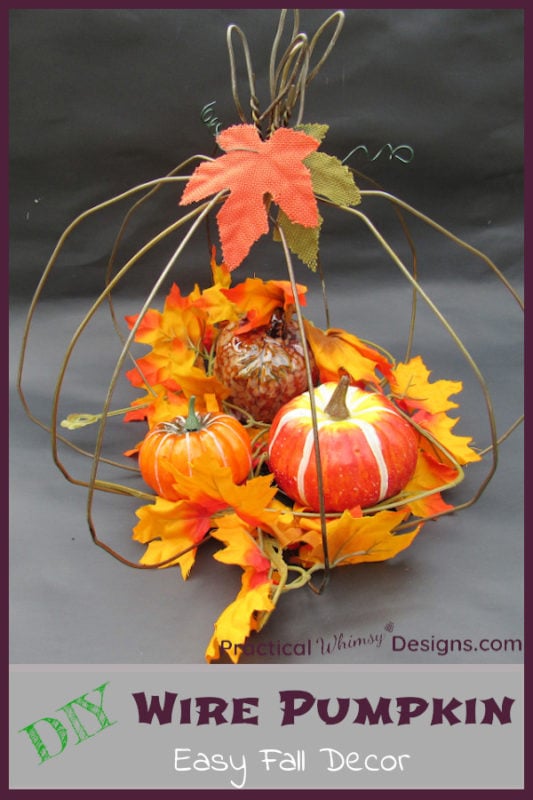
Loving those fall wire pumpkin decorations, but not the price? Here is a fun tutorial that allows you to make your own fall pumpkin decor using upcycled wire hangers.
Too many hangers!
I know that’s not what you were thinking I would start this post out with, but I had to lay it out there straight.
Somehow, we have accumulated A LOT of hangers! You know the kind. The wimpy metal ones that get sent home with your dry cleaning. I don’t even use the dry cleaners and I still somehow have all. of. these. hangers! Am I alone here?
Well, if you are suffering from the wire hanger overload syndrom (it’s not a real diagnosis….but it should be) I have a wonderful wire pumpkin tutorial that allows you to create something fun to add to your indoor Fall decorations.
This post contains some affiliate links for your convenience (which means if you click a link and make a purchase I will earn a small commission at no extra cost to you). Please see my disclaimer page for more information.
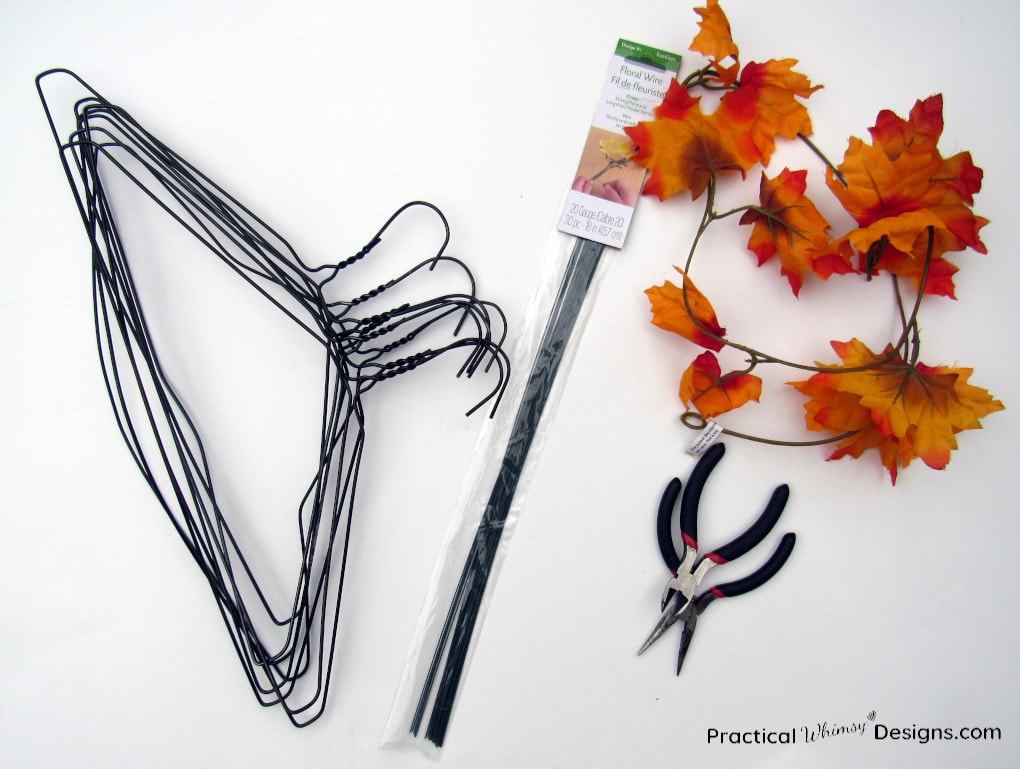
Materials You Need:
- 5 wire hangers (I made 2 pumpkins, 1 with bronze hangers and 1 with black, though if you don’t have the color you want you can spray paint them)
- Wreath wire
- Wire cutters (Similar to these)
- Pliers (I used a needle nose pliers similar to this)
- Fall Decor (to go inside your pumpkin, I found mine at the dollar store but these fall decor items look fun too.)
Steps to Make a Wire Pumpkin
The first thing you need to do is make those hanger shaped wires turn into something a little more pumpkin shaped.
Now, I wish I could say that this was easy, but it does take a little muscle and determination. I mean, these little hangers have been in a hanger shape for a long time. (Unless yours are sagging in the middle like mine from piling too much clothes on a hanger at once. Oops.)
In the case of my saggy wire hangers I was at a slight advantage towards making my hangers pumpkin shaped. However, they still weren’t quite where they needed to be shape-wise.
This is where my thumbs took one for the team and did a lot of experimenting in wire bending techniques. (My thumbs were a little sore after all of my trial and error experiments.)
The technique I came up with may not be the most graceful, but it is the one that worked the best for me. It requires a hard surface (not your carpeted living room) and something that doesn’t scratch easily. I used our tiled laundry room and our patio steps. Another solution could be a cement covered garage. (The rough cement on the sidewalk can scratch the finish off of your hangers so avoid that).
Step 1: Bend the Wire
Now, take a hanger and step on the flat part, grabbing on either side of the hook with your hands. Then pull up with your hands until you have stretched the hanger into a general pumpkin-ish shape. Rotate the pumpkin slightly and keep pulling up on the wire as you round out the wire hanger with your feet.
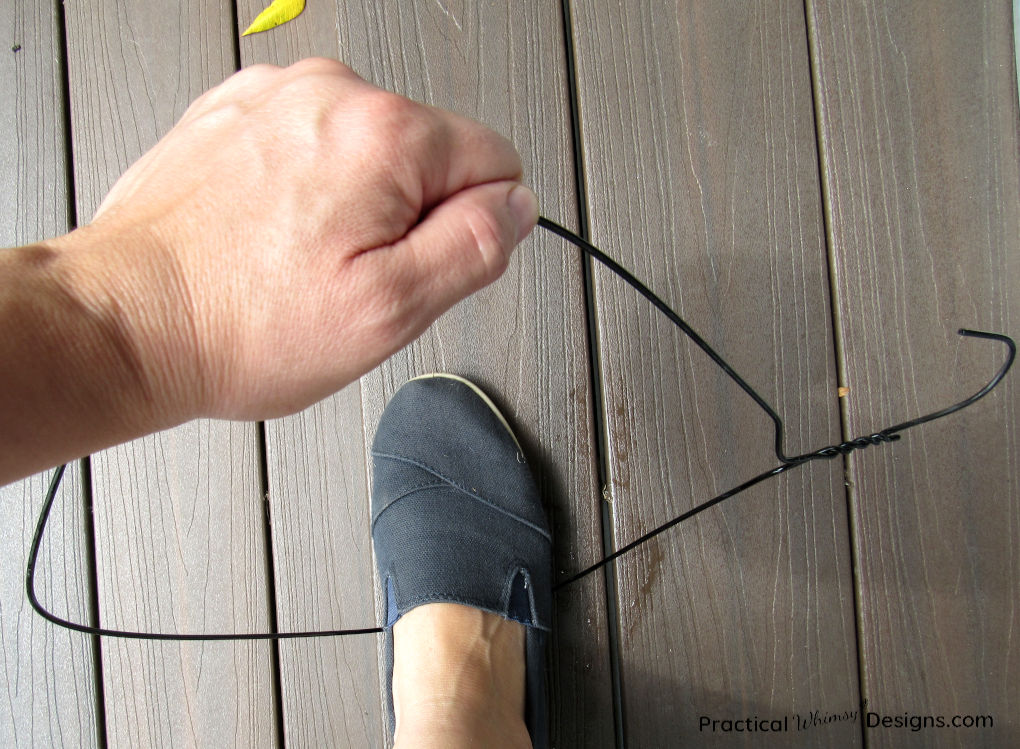
Keep rotating around in a semi circle, working out the hanger kinks and rounding out your pumpkin.
Hey, this might seem awkward, but no one is watching. Make it into a dance…. How about The Hanger Dance?
Shuffle, Shuffle, Stretch, Stretch.
When your hanger is relatively round, use the pliers to straighten out the bumps along the wire where the hanger used to curve in. However, I found that the most effective tool for bending the hangers was my thumbs (thus the sore thumbs after trying many variations). I did use a needle nose pliers for areas that needed a little extra straightening.
Repeat this process for all of the hangers.
I bent 5 hangers per pumpkin.
When all of your hangers are bent, grab them in a stack and bend them with your feet until they are similar in shape.

Step 2: Bend the hooks
Take the pliers and bend the hanger hooks down into a loop. If your pliers are not enough, you can use a hammer to help persuade the hook to obey its new design. Just make sure you put a board underneath to keep from scratching any surfaces.
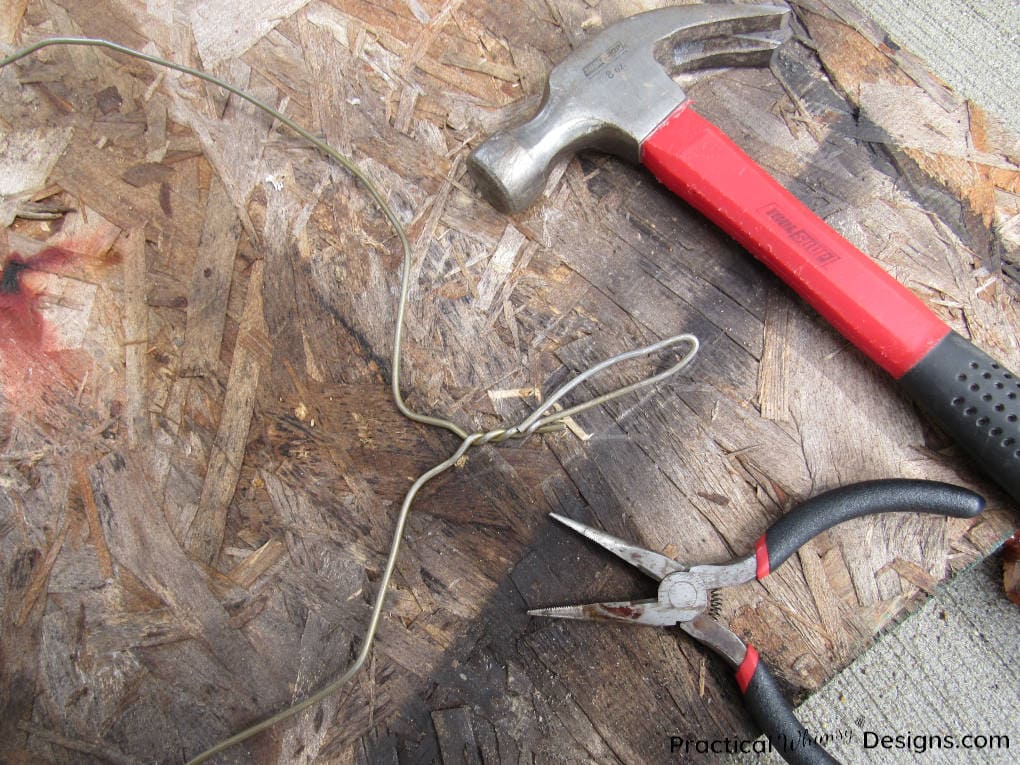
This hook will turn into the stem of the pumpkin.
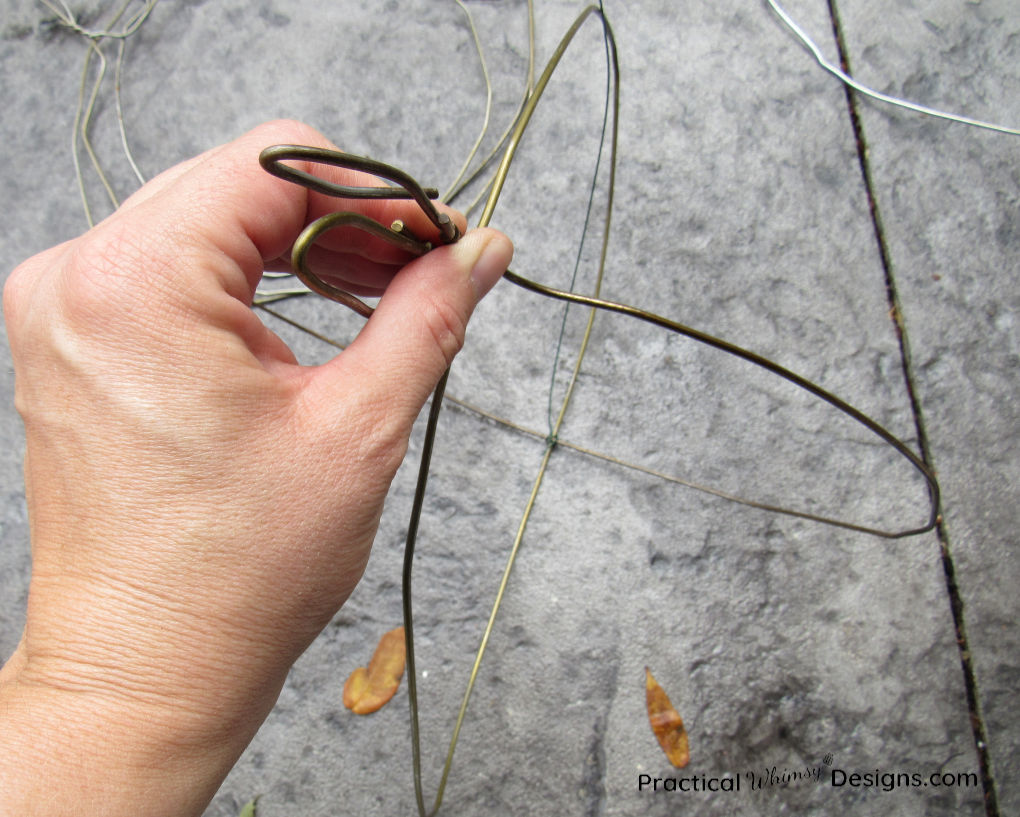
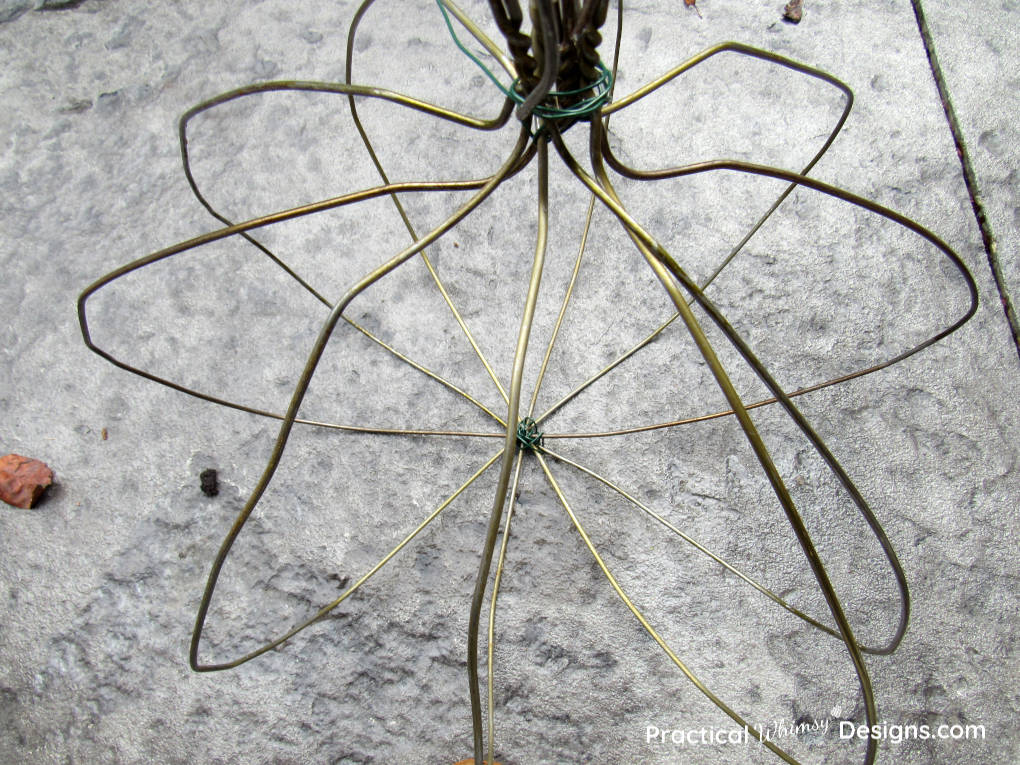
Step 3: Compile the wire pumpkin
Take two of your pumpkin shaped hangers and set them like an x, one inside the other. The stems (hook of the hanger) should meet in the middle.
Criss cross apple sauce.
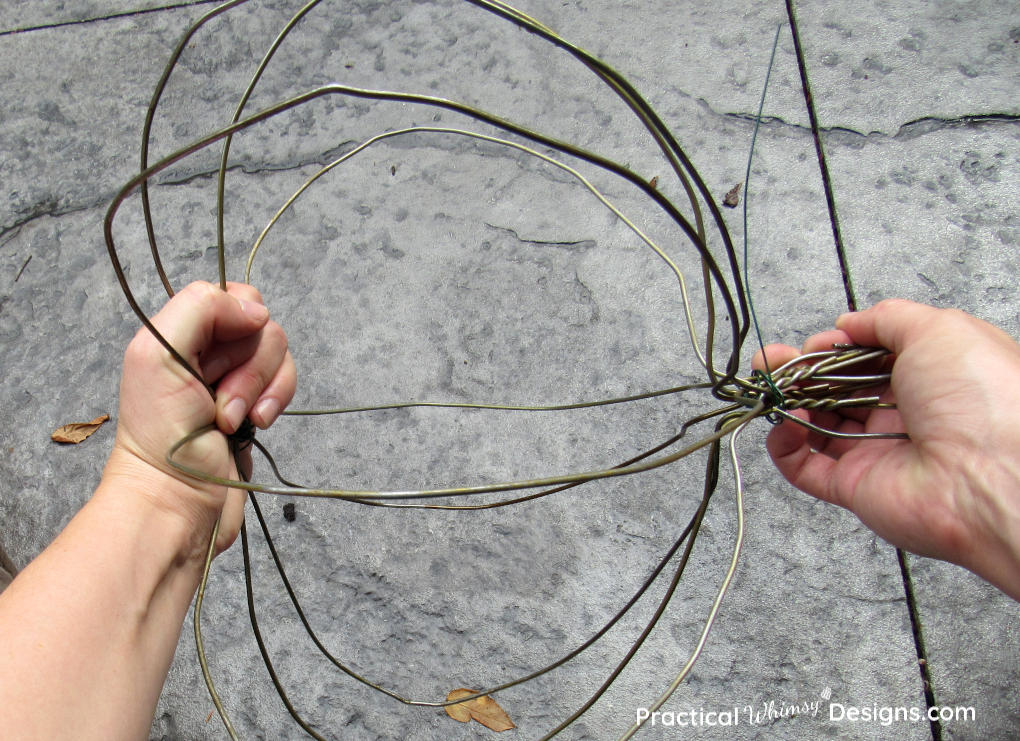
Now, using your wire cutters, cut 2 lengths of wreath wire 1.5 feet long. Wrap one of the wreath wires around the top and the other around the bottom of the pumpkin where the two hangers meet. Leave some of your wire strand available for wrapping more pumpkin wires. I used an x pattern to wrap around the hangers. This should give you a secure base to build the rest of your pumpkin around.
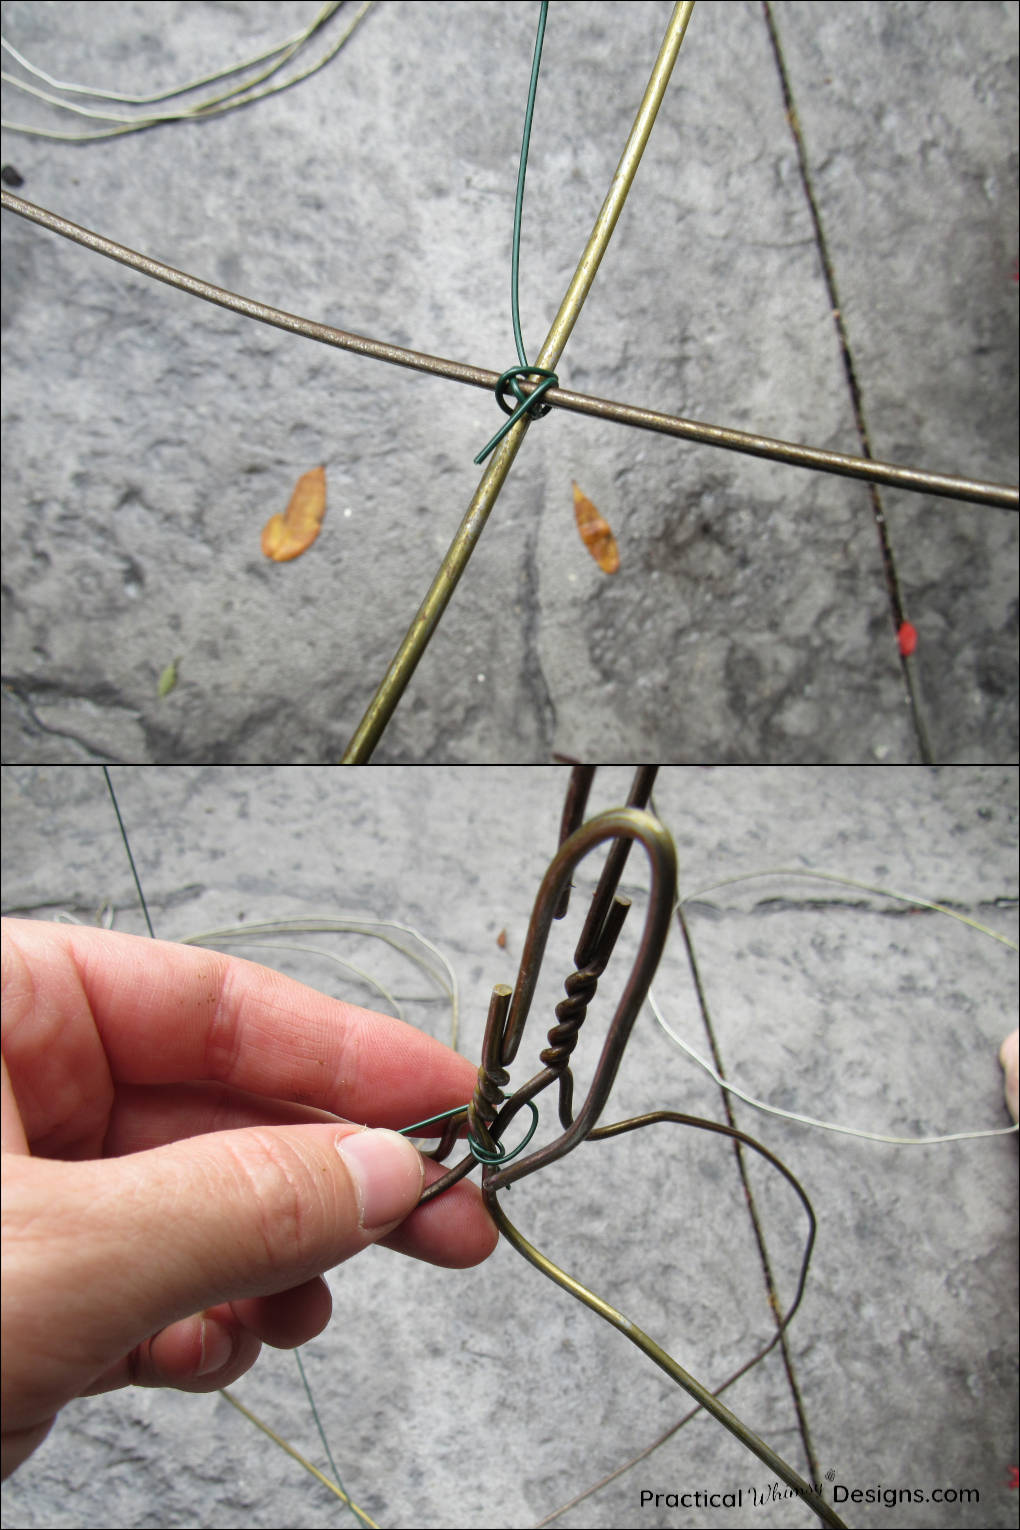
Keep adding the other three hangers into the pumpkin. Remember, the flattened hanger hook should meet in the middle top of the pumpkin to create the stem.
I will admit that this is a little like putting together a puzzle. The hanger wires may need to be bent wider or shorter in order to fit inside or over your other pumpkin shaped hangers. The goal is to evenly space the edges to give your pumpkin a somewhat uniform appearance.
This Does Not Have To Be Perfect! Remember that real pumpkins are not completely straight. If you look closely at a pumpkin, they have nobs and bumps and imperfections. It is what makes them unique and beautiful, just like your wire pumpkin! Just shoot for a generally symmetrical look.
Once you are mostly satisfied with your pumpkin segment arrangement, finish wrapping the top and bottom of your pumpkin with your wreath wire. Use an x pattern and don’t forget to loop the wire through each space in your pumpkin. Pull the wreath wire tight in between each wrap.
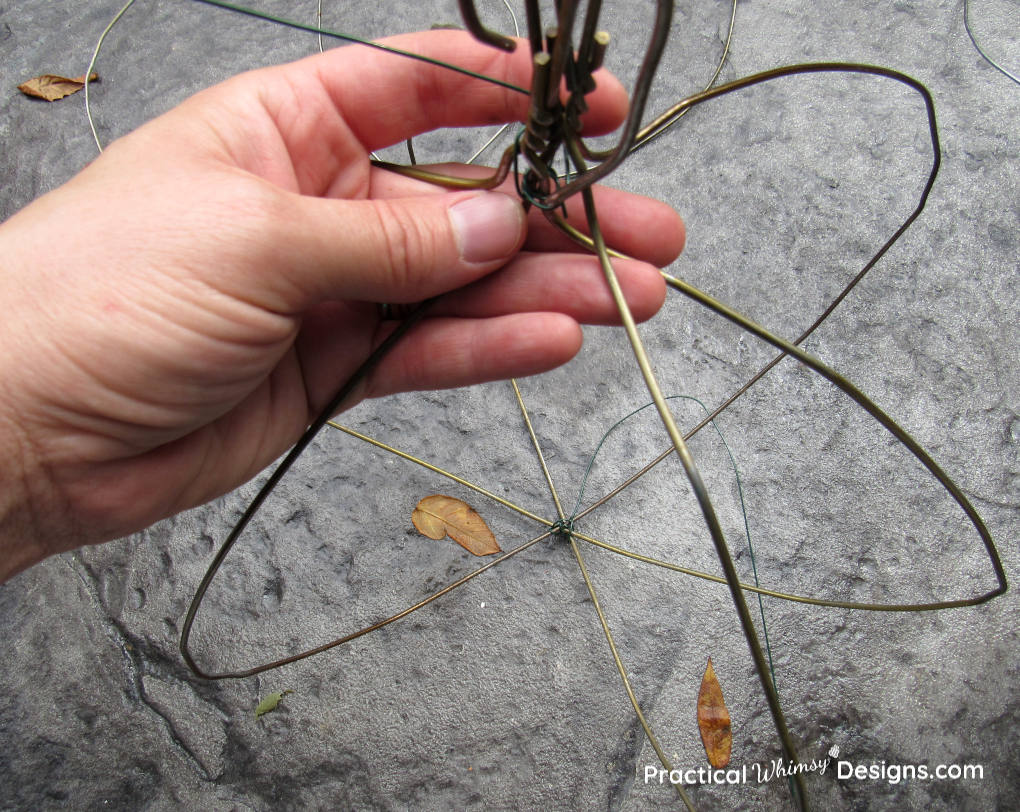
Your pumpkin should look something like this:
Step 4: Form and Decorate
Now that your pumpkin is secure and in a pumpkin-ish shape, you will need to do a little more bending. (I promise this is the last of it!)
Push the bottom of the pumpkin up (where the pumpkin is tied together in the center). Your goal right now is to create a flat bottom so your pumpkin can sit on a shelf or table.
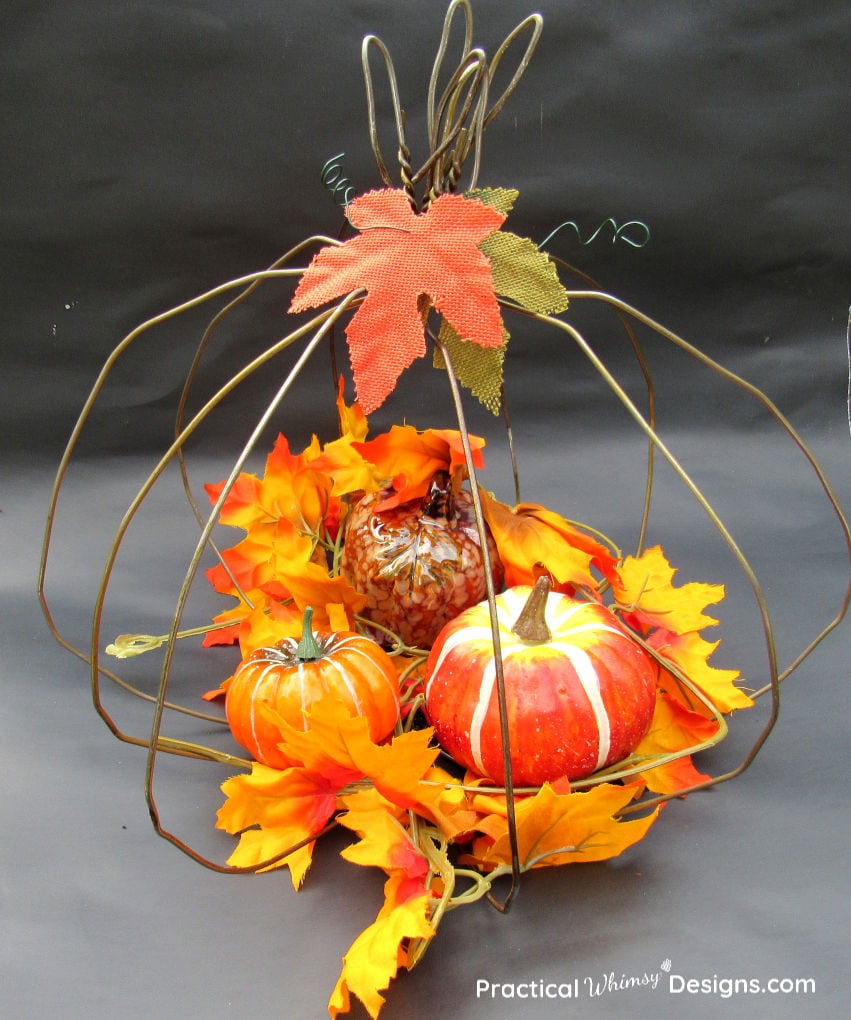
Next comes the fun part! You get to decorate your pumpkin!
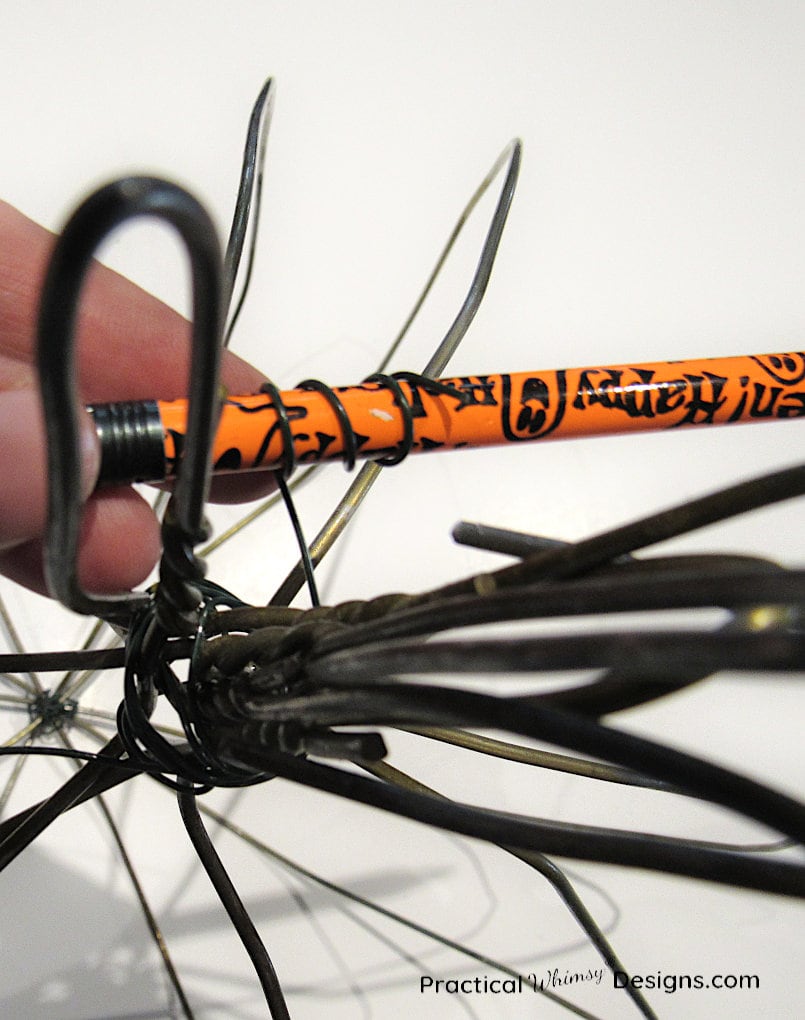
Use a foot of wreath wire and wrap the center around the stem of the pumpkin, leaving the sides to overlap about 4 inches. Take a pencil and wrap the ends of the wire around it to make a curlicue. Do this on both sides to create vines for your pumpkin.
Here is where you can add your own personality to your pumpkin, but this is what I did to decorate:
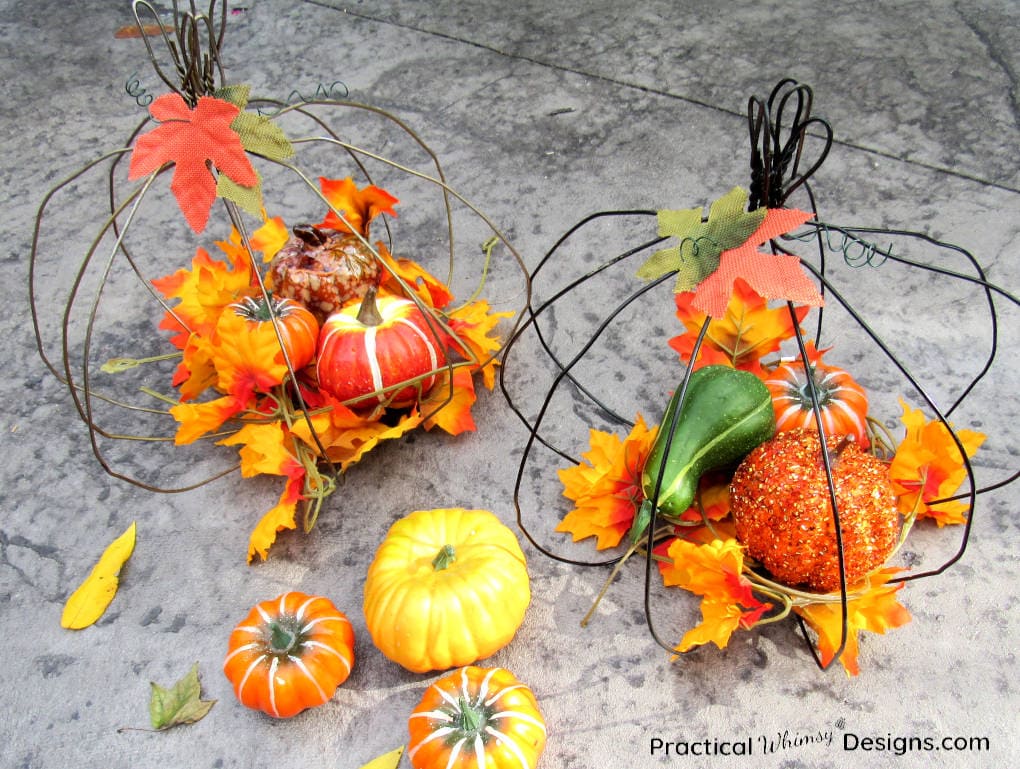
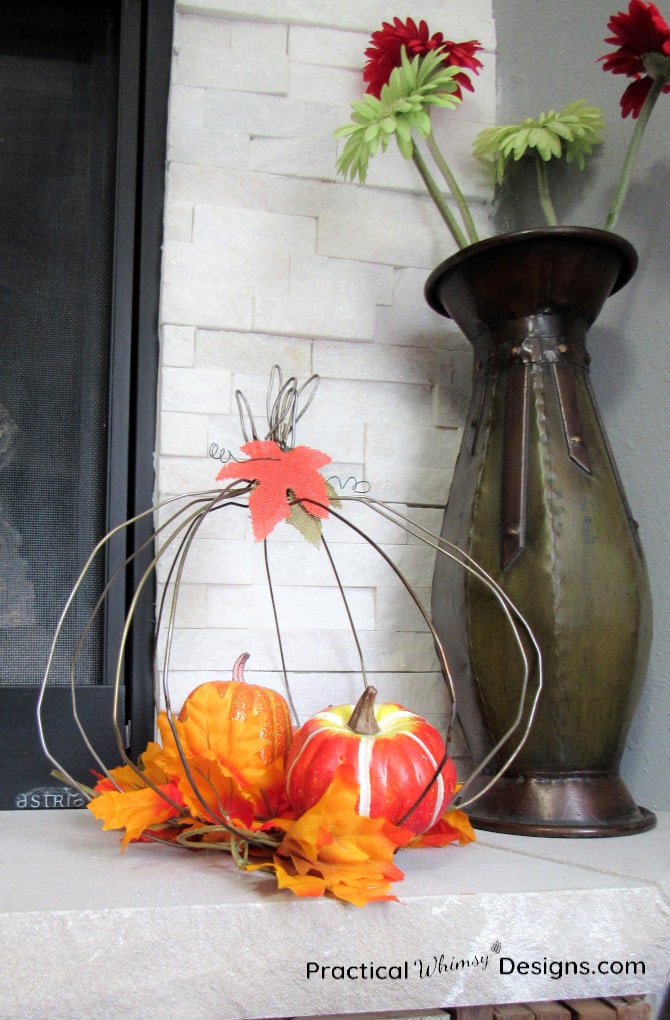
I took two fabric leaves and poked the curly vines through them to add some color on top of my pumpkin. (If you are having trouble finding fabric leaves for sale you can make your own using this tutorial.)Then I filled the center with a fall leaf vine, mini pumpkins, and gourds. I was able to purchase all of my fall decor from the dollar store, so the total cost of this decoration was only a few dollars total. That’s why the dollar store is on my list of unexpected places to get cheap home decor.
DIY Wire Pumpkin
I love my wire pumpkins. They add a fun element to my fall decor.
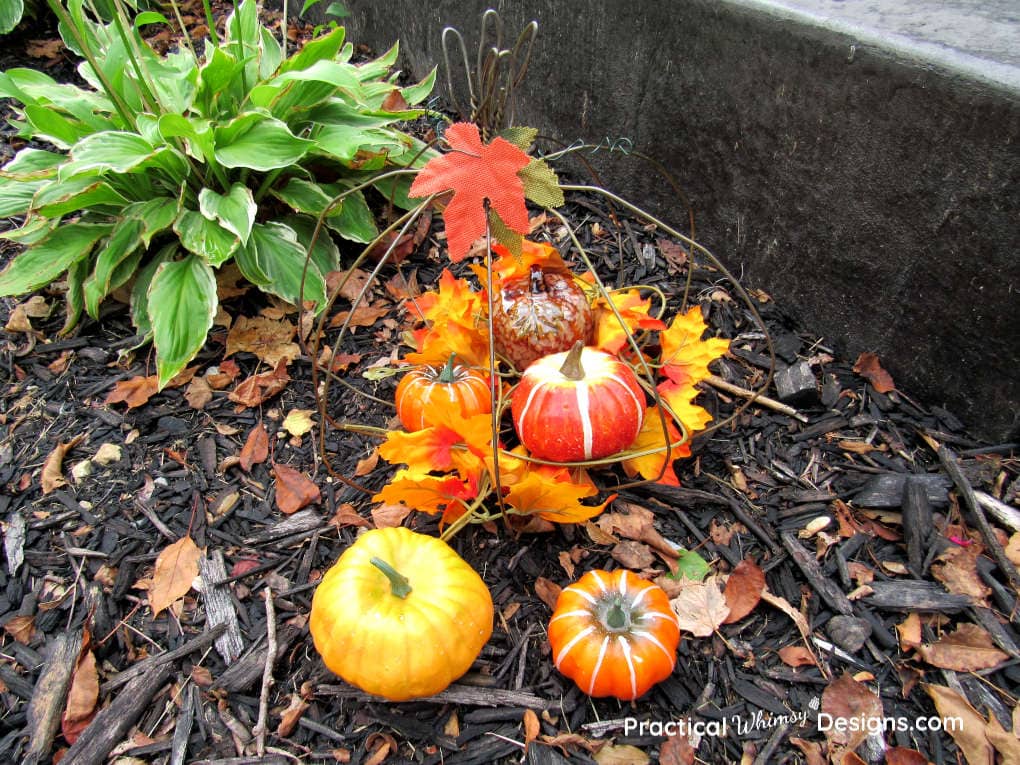

I still haven’t decided if I like the bronze or the black better, but I am excited to add them to my indoor fall decorations this year. They also work great on a porch and I have used them as part of my fall porch decorations.
Want to make this wire pumpkin later? Save this ideas to your favorite DIY Pinterest board.

What about you? What other unique crafts or ideas have you used hangers for?


Cute – very creative!
FYI you might check with your local dry cleaners – we take them back for them to reuse. My husband gets his dress shirts laundered. They add up!
That is a great idea, though it has been fun coming up with ways to use the hangers in my home. I will definitely keep that in mind if I run out of ways to use them.
Looks like fun Erin. I just might have to try it. I also think your blog is going to be extraordinary (one of my favorite words) I love fall just that it’s so short
I know! I love Fall too, but it does seem to go by quickly. I hope that you have fun creating your own pumpkin! Thank you for your support and kind words.