
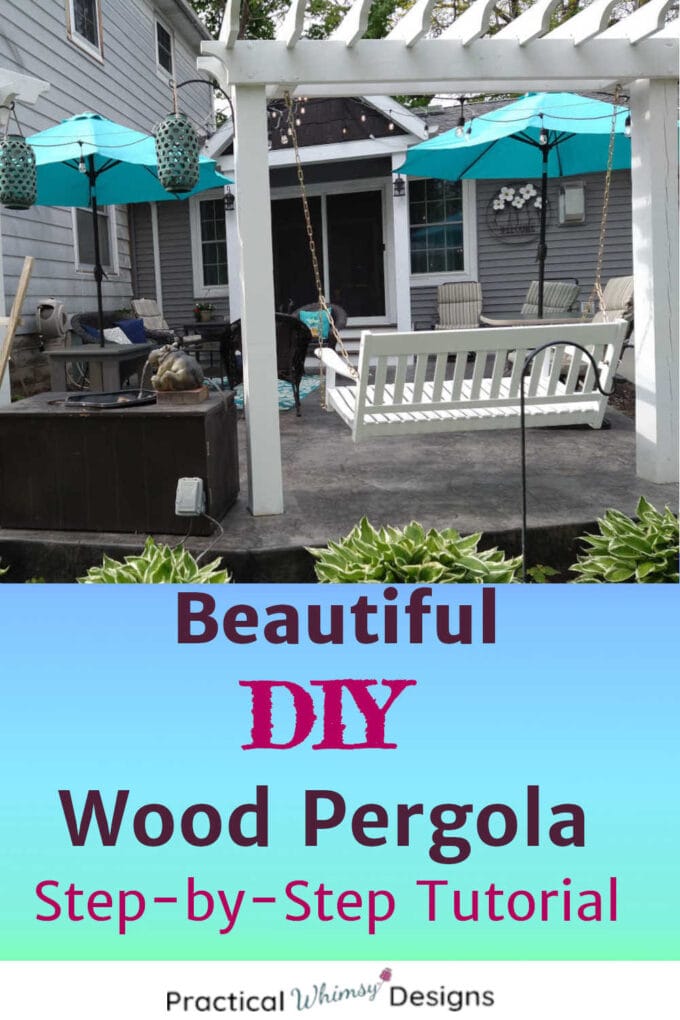
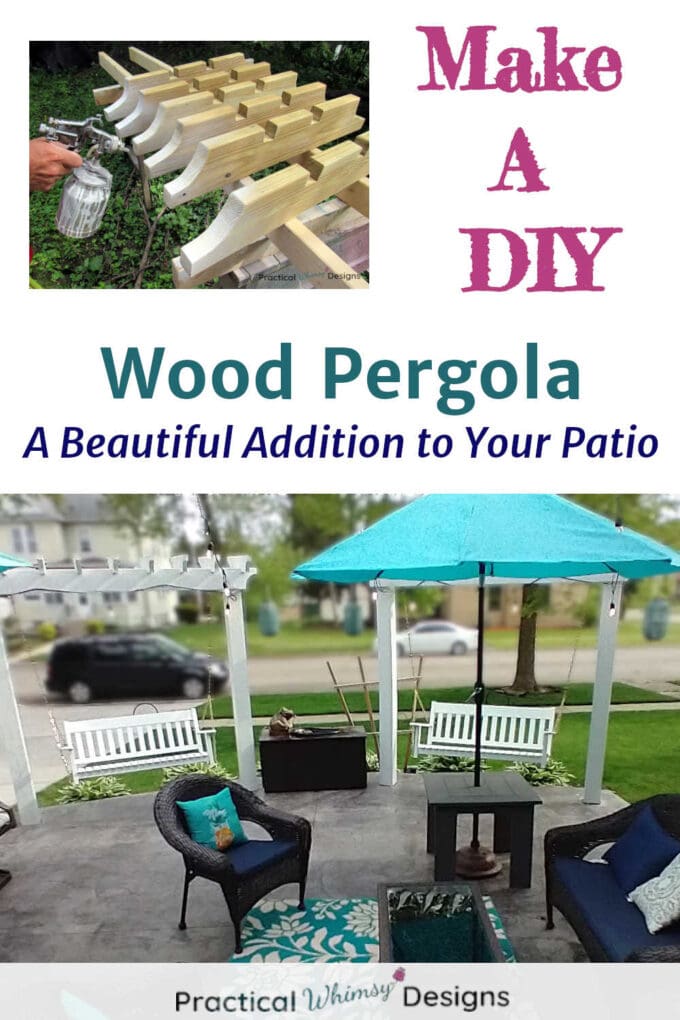
Follow this tutorial to learn how to build a DIY wood pergola for a swing. These pergolas are perfect for an outdoor patio or garden.
Struggling with finding the perfect paint color for your home? My design guides are available for free to my newsletter subscribers. Grab my Free Paint Guide and FINALLY pick a wall color that you love!
Wooden pergolas can be a great option for your home. They are a simple, yet ornate structure that can enhance your yard.
However, you may be wondering why you should build a pergola since most pergolas don’t do a very good job at keeping off the sun or the rain. What is the point of a pergola?
Why Build a DIY Wood Pergola?
There are multiple reasons to build a pergola.
- Curb Appeal. A pergola can add a beautiful and ornate feature to your home’s gardens, patio, or yard. Creating a pergola for your home can add a unique look to your home and make it more appealing.
- Extra Seating. Building a wood pergola for a swing gives the added benefit of not only a beautiful structure, but a place for more seating. You can also add a bench under a pergola if you don’t have room for a swing.
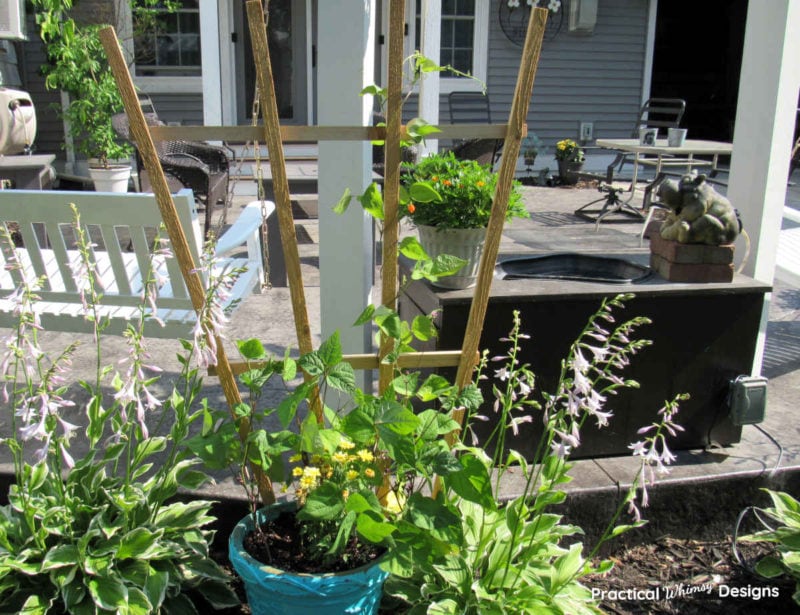
- Framing a Walkway or Garden Feature or as Part of a Trellis. Pergolas can define your garden space, giving visual cues to help highlight walkways or garden features. They also can be a base for some climbing plants and flowers.
If building a diy wood pergola is something that interests you, take a look at this tutorial that shows the basic steps of creating one of your own.
This post contains some affiliate links for your convenience (which means if you click a link and make a purchase I will earn a small commission at no extra cost to you). Please see my disclaimer page for more information.
Materials You Need:
Material
- 2- 12 foot 6×6 green treated or cedar posts
- Gravel to place in bottom of holes
- Cement (enough to fill your holes)
- 2 – 8 foot 2×8 green treated or cedar boards for the beams (This may vary depending on how far your posts are spaced)
- Screws
- 3 – 8 foot 2×6 green treated or cedar boards for the pergola rafters
- 3/8 x 5″ spax screws
- 1/4 x 3″ spax screws
- Block of wood for hanging swings
- Paint or stain and applicators, opt.
Tools
- Shovel or post hole digger to dig holes for posts
- Tape measure
- Carpenters square
- Pencil
- Level
- Circular Saw
- Sawzall/Reciprocating Saw
- Compass or round object to cut out end pattern
- Jigsaw
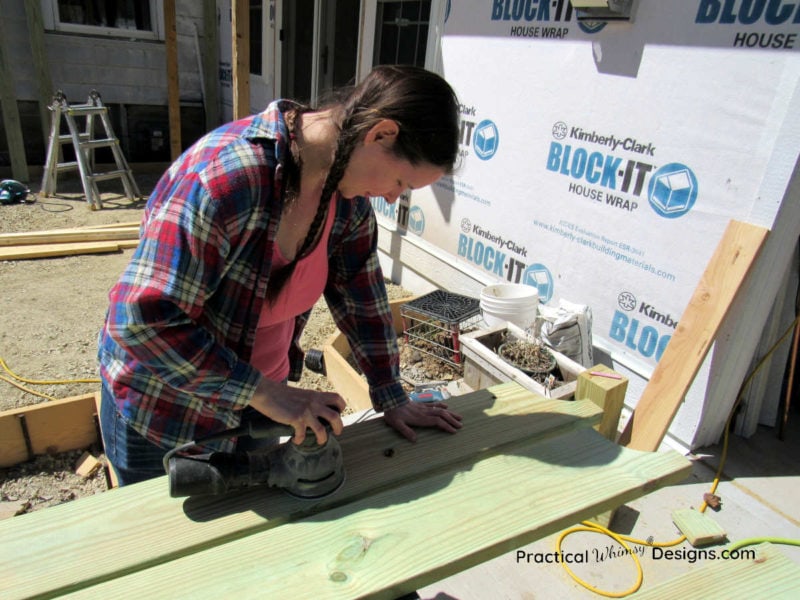
- Orbital Sander (I like this brand)
- Drill & bits
- Sawhorses to place boards on for cutting
- Impact Drill for Spax Screws
Swings
- Swings (These are the swings we purchased)
- Hardware and chain to hang swings
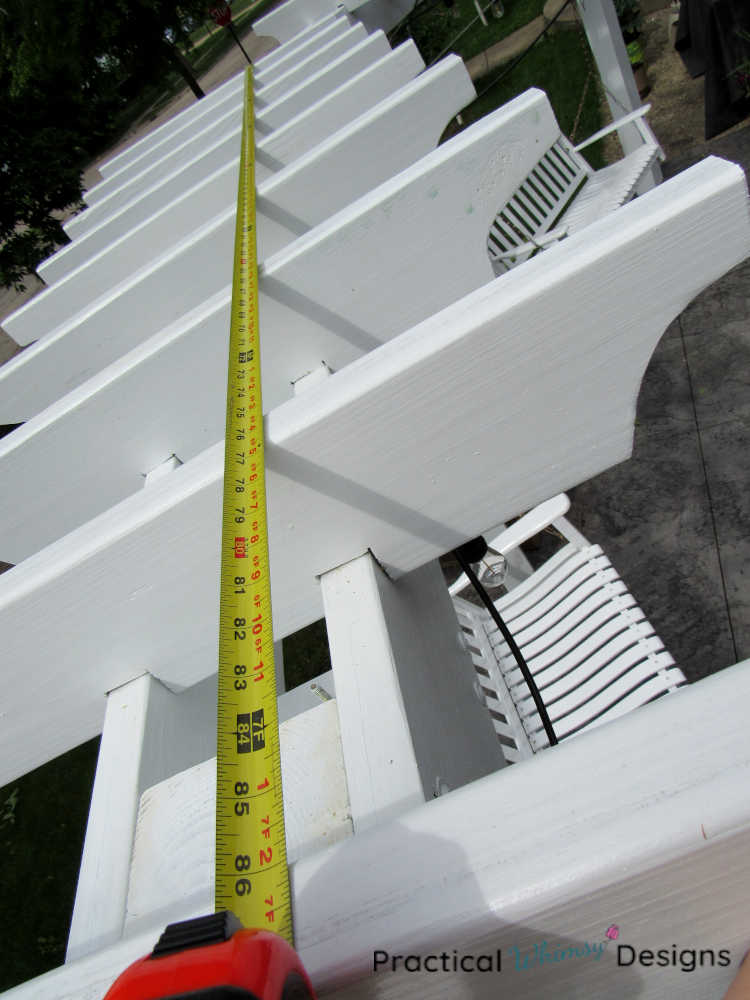
Note: These instructions are for a wood pergola that is 84 1/2″ wide from outside post to outside post, 73 1/2″ wide from inside post to inside post. You will have to adjust the measurements if you want a different size.
How To Build A DIY Wood Pergola for a Swing
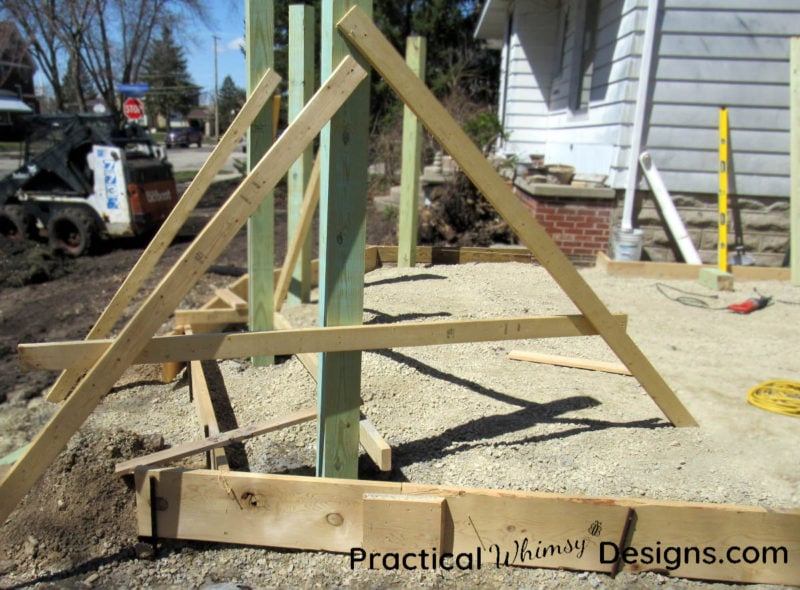
Step 1: Lay the Foundation
One of the most important pieces of the wood pergola is the foundation. The frame needs to be solid and level to keep the structure secure, especially if you are going to attach a swing to it.
The first step is to decide how wide you want your pergola to be and mark where you are planning to dig your holes for your poles.
We determined our size by looking up the size of the swings we were planning on purchasing and using that width plus another 11″ or so on either side to allow for the swing to move without running into the posts.
We spaced our two main poles 73 1/2″ apart from inside edge to inside edge of each post.
Note: Building codes for your area may be different, so make sure to check with your local building office.
We dug a 4 foot hole for each of our green treated posts. We put gravel down into the hole and then added our 12 foot tall 6×6 post. (You want to use green treated wood for outdoor projects. These have been chemically pressure treated to last longer in the harsh outdoor weather. Cedar is another option for an outdoor wood pergola.)
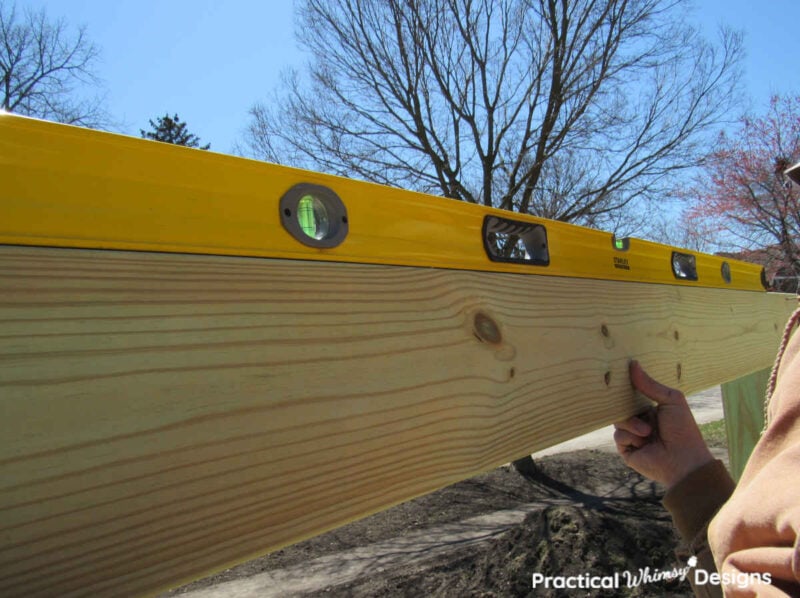
For your next step, fill the rest of your 4 foot hole with cement to hold the pole securely in the ground. Use a level to make sure the posts are level and then use an A-brace to hold them securely in place while the cement dries. (Head over here to learn how to build an A-brace to support your post while the cement cures.)
Step 2: Cut down the 6×6 post to proper size
Once the cement cures around your post, decide how tall you want your pergola to be.
Since our patio cement was going to be filled in around our posts, we needed to figure out the height we wanted our pergola from the height of the patio cement.
We wanted the bottom of the middle beam on our swing pergola to be 77″ above the ground so that we wouldn’t bump our heads on it. Since we were using a 2×8 for our beam, we measured 7 1/4″ up from 77″ and decided to make our posts 84 1/2″ tall from the patio to the top of the post.
Tip: 2x8s are no longer a true 2 inch by 8 inch measurement like they were in the past. They are now 1 1/2″ by 7 1/4″ even though we still call them by their old measurement.
Disclaimer: This post is for informational purposes. There is always a risk when using power tools and certain safety recommendations to follow. Get help from an expert if you need it.
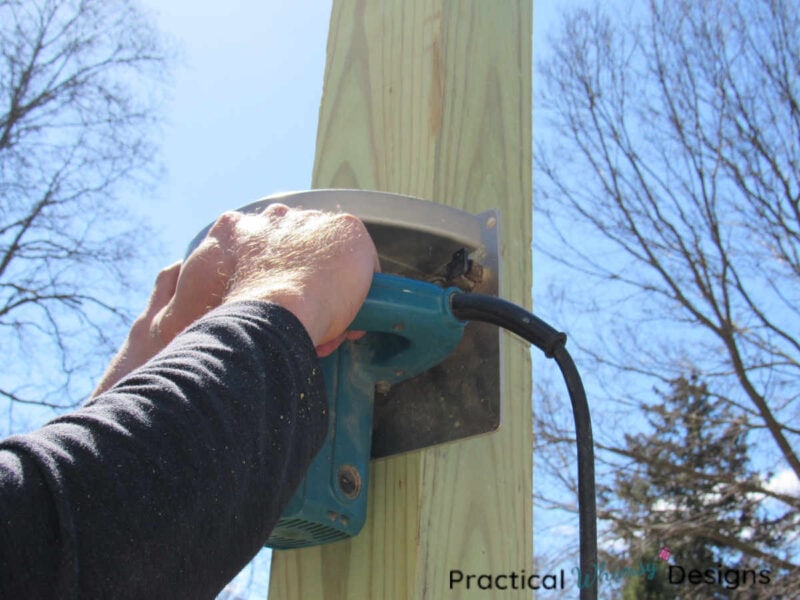
Since our 12 foot post was too tall, we needed to cut some off of the top. We marked a straight line with a carpenters square around the post at 84 1/2″.
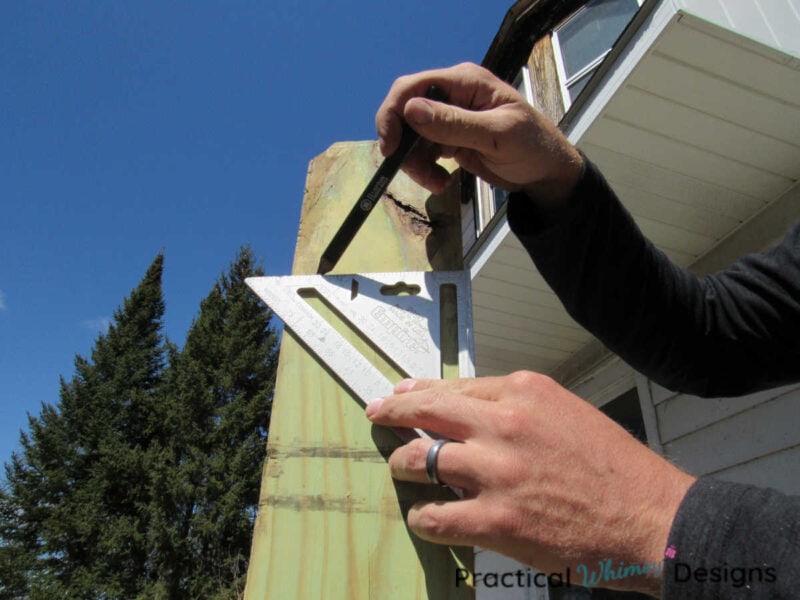
Then we used a circular saw to cut each side of the post.
Remember: Always measure twice to make sure you are right before you cut. Measure twice, cut once.
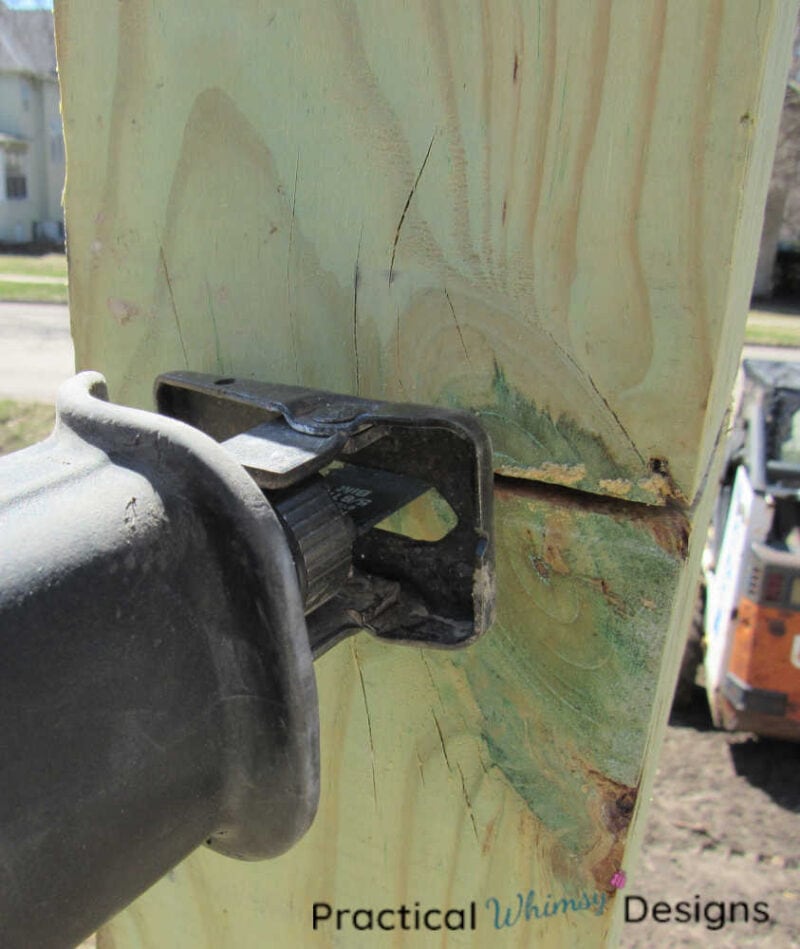
A circular saw only cuts about 2 inches into the wood so we finished cutting through the post with a reciprocating saw. Cutting with the circular saw first gave us a straighter cut.
Step 3: Cut the wood pergola beams
Once your post is the correct height, it is time to move on to the beams.
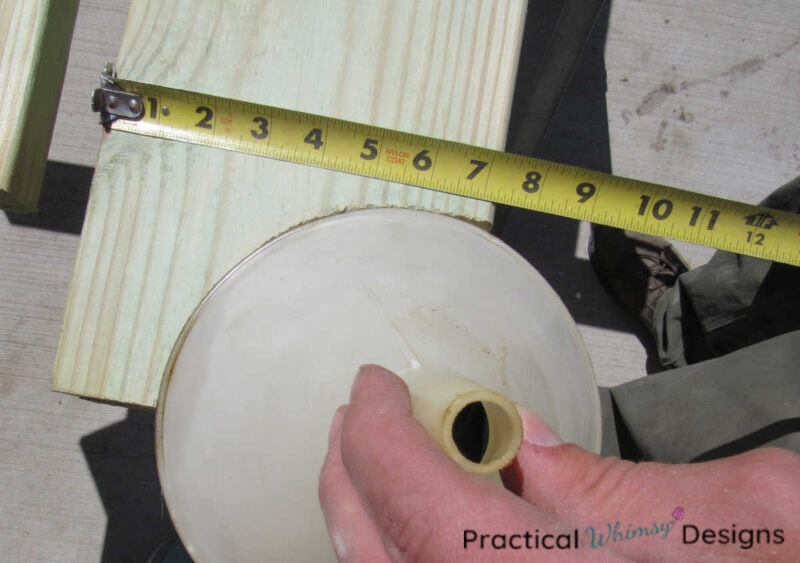
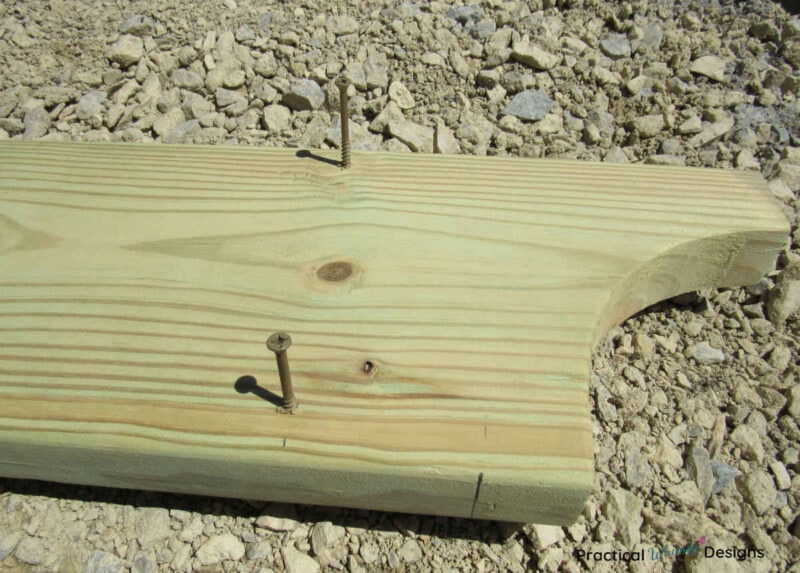
If you are following our measurements, take an 8 foot 2×8 and cut a design on each end to your liking. Any circular object works to create the rounded look on the end of your pergola beams.
We used an oil funnel we had sitting in our garage, though if you want to be more official, you can use a compass.
You don’t want to cut your board design too far in so make sure to measure where your posts and beam overlap.
Our posts measured 84 1/2 inches wide from outside edge to outside edge.
We wanted our beam to over hang our post on the bottom by 1 1/2″ and we wanted the small portion on the top to be at least 2 inches thick. We set our funnel down 2 inches from the top of our board and traced around the oil funnel in a semi circle.
Then, we cut out the semi-circle with a jigsaw to create a cove.
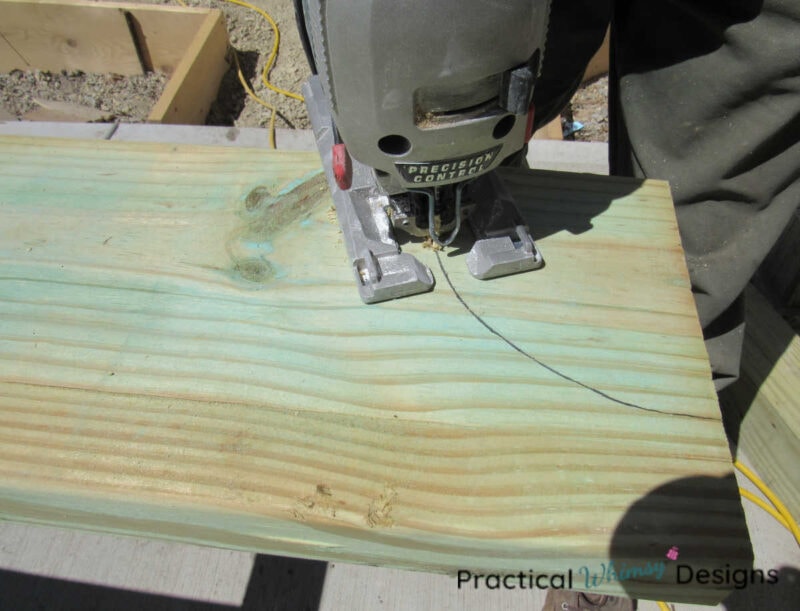
Once you have the pattern on the first side of your beam, use it as the template for the other three sides. That way you will be using the same pattern on the rest of your beams and they will look symmetrical.
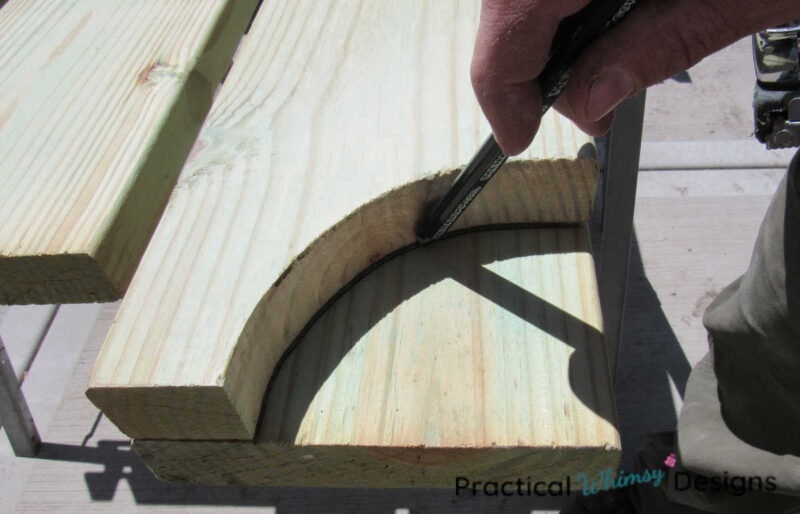
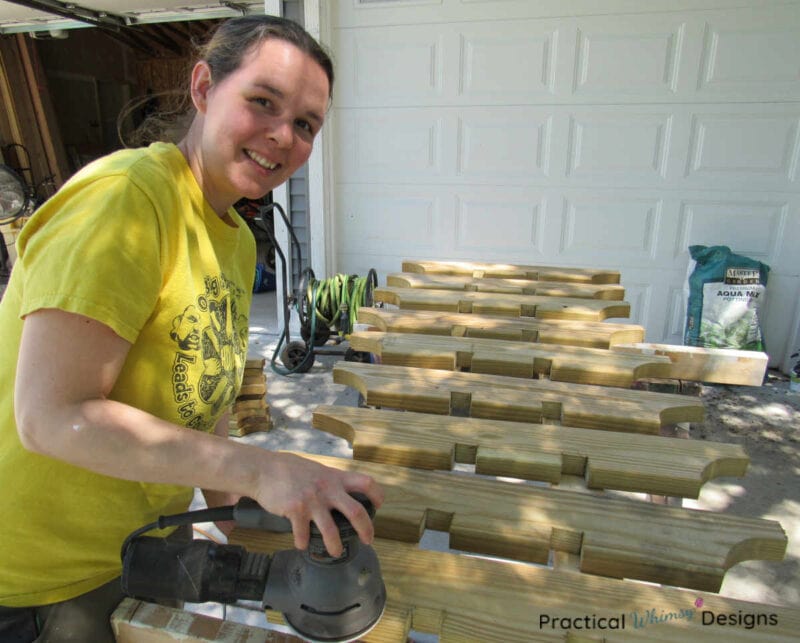
Sand your beams thoroughly to eliminate any rough edges. This will keep you paint from chipping later.
Step 4: Set the wood pergola beam
Now that you have your beams cut, it is time to attach them to your pergola posts.
If you are using a 2×8, measure 7 1/4″ down from the top of the post and mark that measurement with a pencil on both the front and back of both posts.
Measure the outside edge to outside edge of your posts. (Ours is 84 1/2″)
Then measure from bottom of cove to bottom of cove on your newly coved beams. (Ours was 87 1/2″)
Divide the difference between the two to determine an equal space to overlap your beams. For example: 87 1/2″ – 84 1/2″ = 3 inches. Divide that by 2 and our beam should overlap by 1 1/2″ on each side.
Measure with a tape measure and mark your measurement on each beam to create exact spacing so the overhang will be equal on each end of your pergola. (In our case we measured 1 1/2″ in from each cove.)
A couple of tips when attaching the pergola beam:
Tip #1: Use a drill to set the screws part of the way in while the beam is on the ground. That way, it is easier to screw into the post when you lift the beam up to attach it.
Tip #2: If you are screwing the beam in by yourself, insert a screw on one post on the measured pencil line to hold the beam board up while you are attaching the beam to the other post.
To attach the pergola beams: Line up the measuring lines you made earlier. Put a level on top of your beam and screw the beam into the post. Make sure it is level and then continue attaching it to the post.
Repeat for the other side. You should have a beam on the front and the back of your pergola post when you are done.
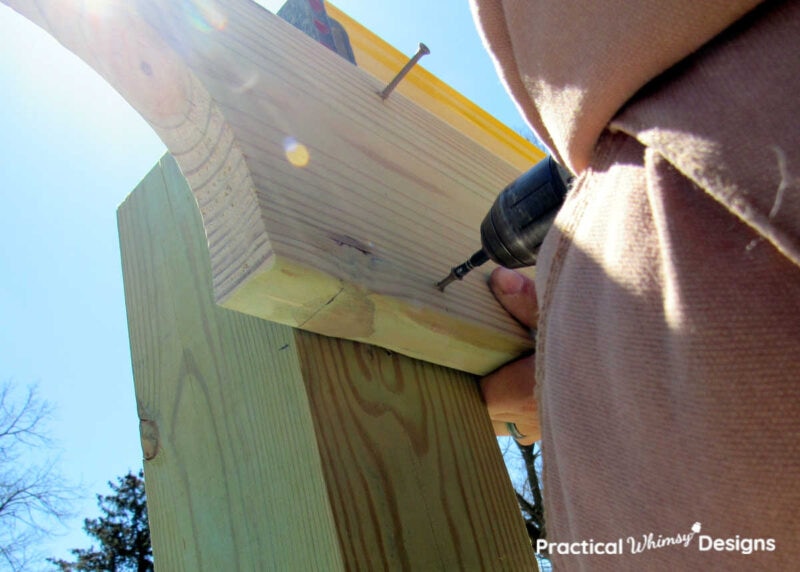
Once the beams are screwed in, use 3/8 x 5″ spax screws with an impact drill to add more security to the beam and screw them into the post.
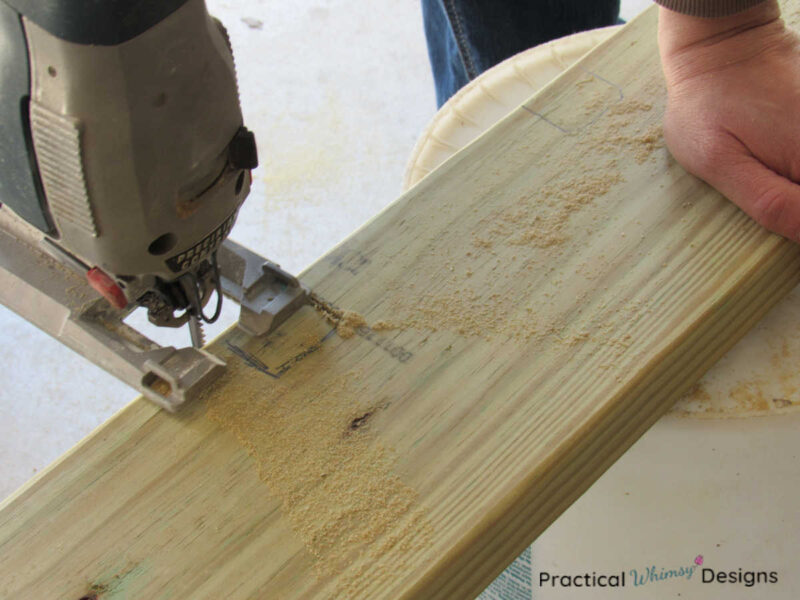
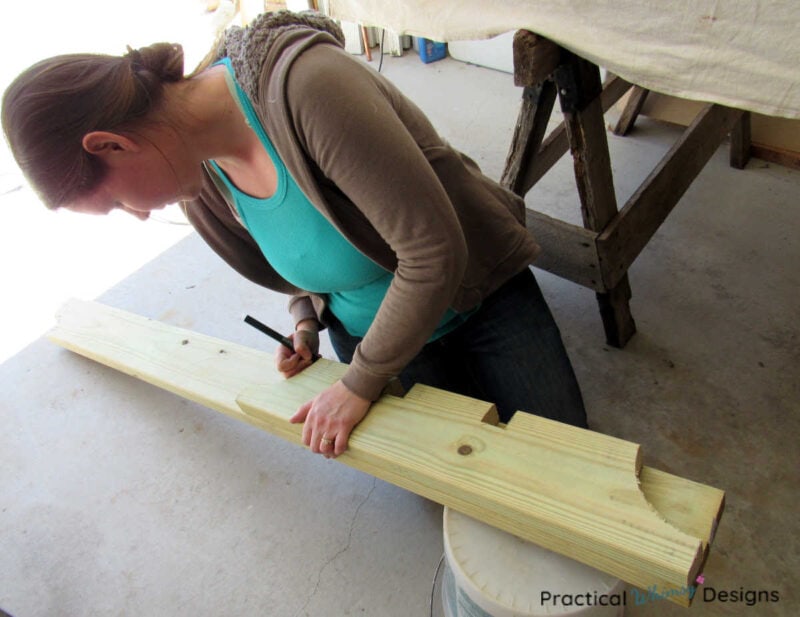
Step 5: Cut out the pergola rafters
The next step is to cut out pergola rafters.
Note: For ease, I am going to give you the measurements we used. You are free to play around with the sizing to fit your style, taste and how far you want your rafters to overhang.
Cut 3 – 2×6 8 foot green treated boards into 30 1/2″ lengths with a circular saw. You should be able to cut out a total of 9 rafters.
Create a similar cove or arch pattern on your rafters as you did on your beams, using a round object or compass to create the arch. Cut out the arch with a jigsaw.
The measurements we used for our rafters:
- Top of rafter: 30 1/2″
- From bottom of cove to bottom of cove: 22 1/2″
- Start arch 2″ down from top
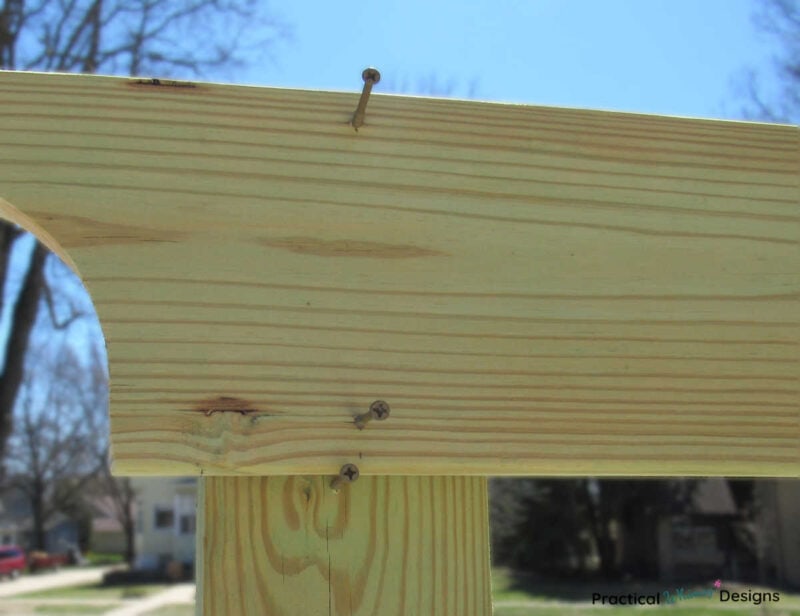
Once your first rafter is cut out, place the 22 1/2″ bottom across the two beams and center it so that there is an equal amount overhanging on each side. (Our rafter tops overhang the center beams 7″ on the front and the back.)
Mark the two top plates of the beam where they meet the rafter and cut out a 1 1/2″ deep and wide notch into the rafter so it can sit over the beam. This will add stability to your rafter.
Use your first rafter to trace your pattern onto each additional rafter so that it is the same.
Once you have your 9 rafters cut, sand them with an orbital sander until they are smooth.
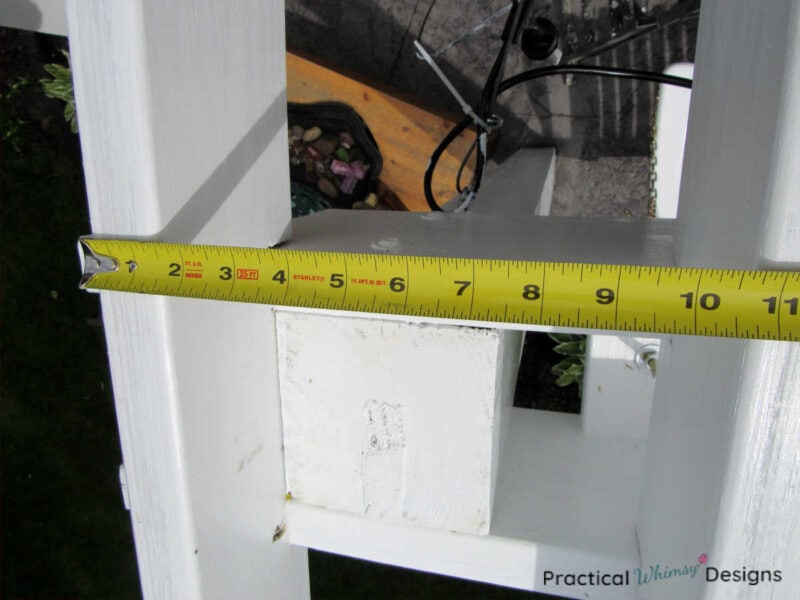
Step 6: Attach Swing Block
Use 1/4 x 3″ spax screws to attach a block of wood between the two beams next to the post where the swing chain will hang.
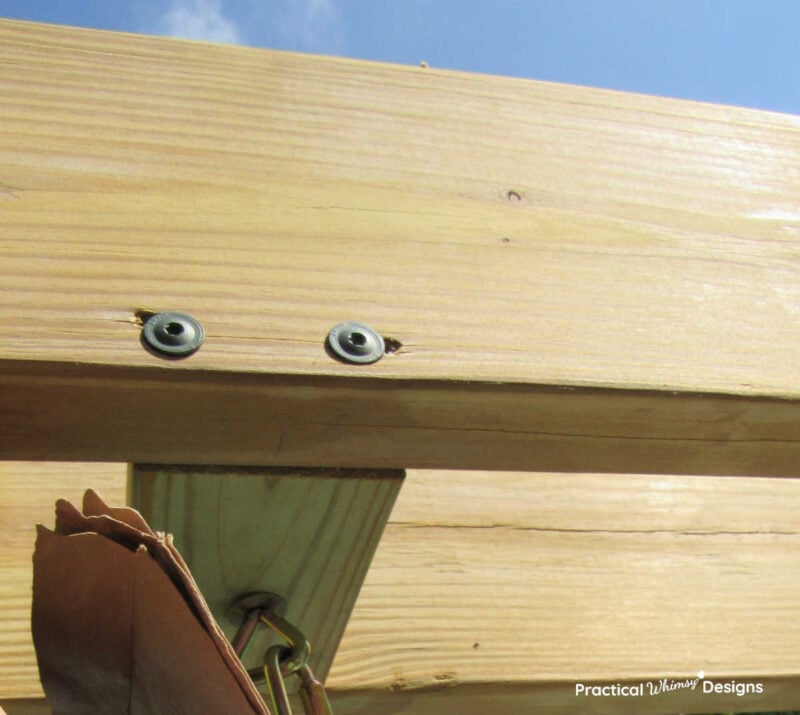
Make sure to place it in a good location for your swing chain to hang comfortably.
Step 7: Paint
If you use cedar boards for your diy wooden pergola, you will want to paint or stain them right away.
If you use green treated wood, you will want to wait before painting. The pressure treated wood needs to dry out before it will allow paint to adhere to it.
You will most likely need to wait 6 months to a year before staining or painting.
To see if your green treated wood is ready to paint, sprinkle water on it. If the wood absorbs it, it is ready for stain or paint. If the water beads up, it needs to dry longer.
Once it is ready to paint, clean it well. We actually waited to attach the rafters to the pergola until our green treated wood was ready to paint. We then sanded and painted them with a paint sprayer.
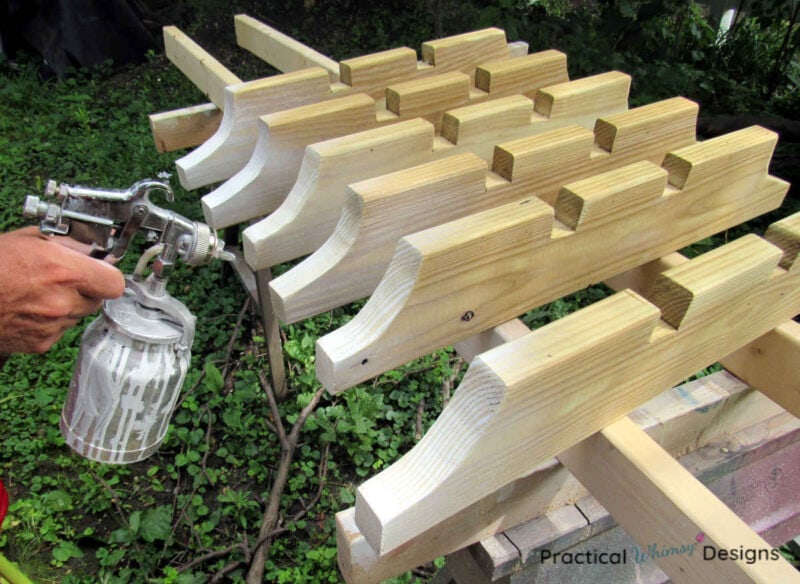
Prime it with an outside primer and paint it with an outdoor paint.

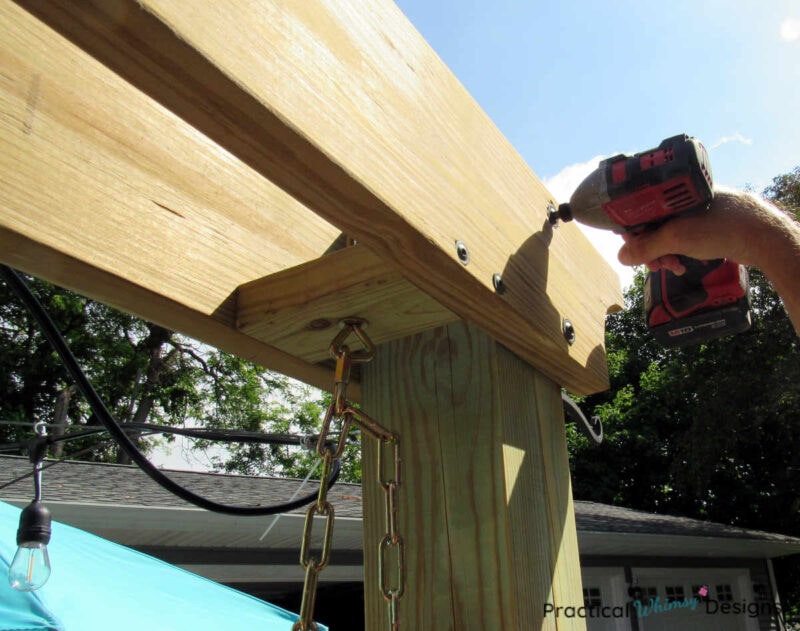
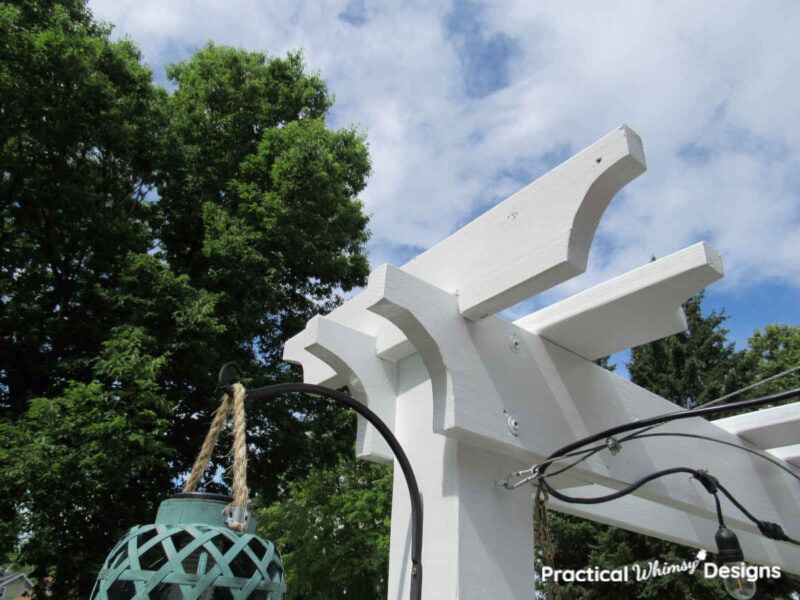
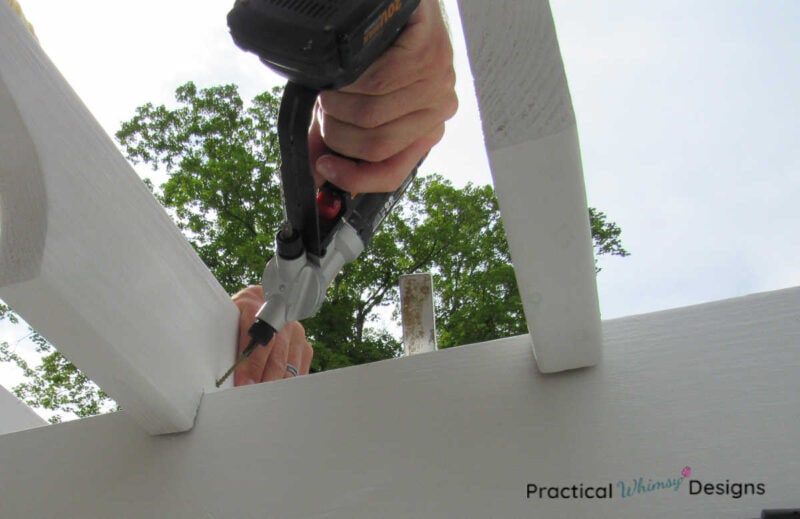
Step 8: Attach the rafters to the pergola
Once everything is painted and dry, attach the rafters to the beams.
Start by setting two rafters on either edge of the pergola. We lined the inside edge of our first rafter up with the outside edge of the post.
Measure with a tape measure between the two outside rafters to see how much room you have left to work with. Then evenly space your rafters on the pergola beams.
Example: From the outside to the inside of our 2 rafters = 86″. We had 7 rafters left which means we had to create 8 equal spaces. 8 Divided into 86″ = 10 3/4″.
Tip: Measure from the outside of the rafter on your left to the inside of the rafter on your right. This will give you the measurement from the center of one board, to the other and you can evenly divide up the remaining area among your rafters.
We set each of our rafters 10 3/4″ apart.
Once the rafters are evenly spaced and you are happy with their location, pound the notched area you cut out early down onto the beams with a hammer.
Pre-drill from the top of the notch on the rafter into the beam with an electric drill and drill bit. The hole should be slightly smaller than the shaft size of the screw you are using.
We used 2″ long screws to screw the rafters into each of the beams.
Step 9: Add the Swing and Decor
Attach the hardware and chain for the swings to the support block under the pergola beam.
Hang your swing.
Add any other decorations to the swings.
We added plant holders to the sides and hang either plants or solar lanterns from them.
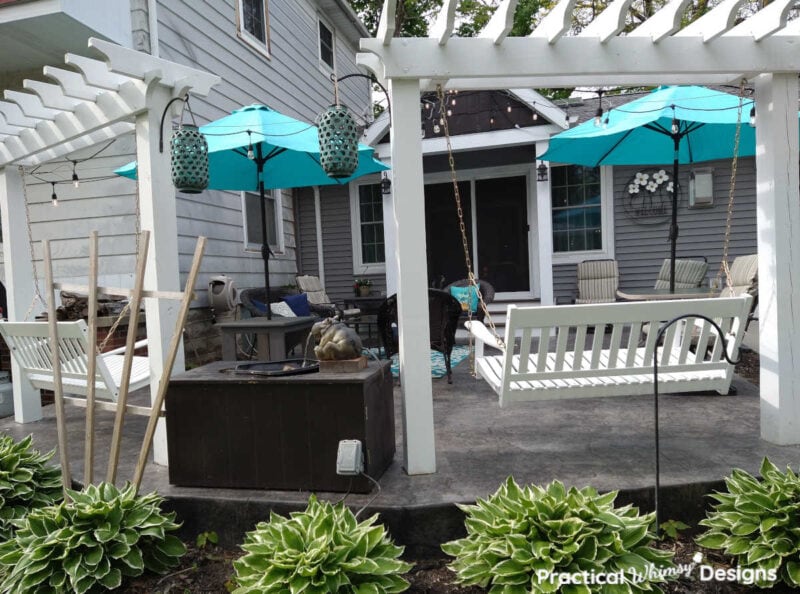
DIY Wood Pergola for Swings
Here are the finished results of the DIY wood pergola we made. We actually built two of them for our patio.
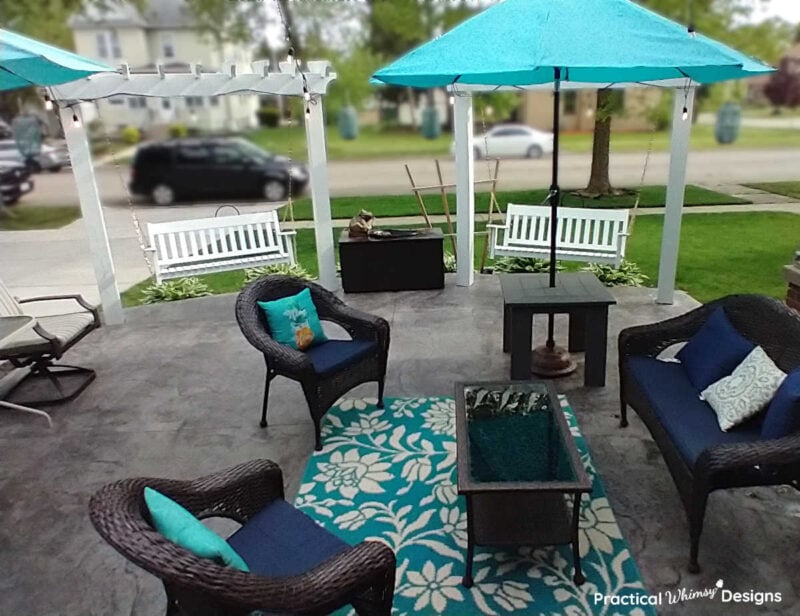
I love the swings we purchased for our patio. They are the perfect look for our pergolas without being too expensive.

Answers to a Few Pergola Questions
What Size Should You Build Your DIY Wood Pergola?
That depends. The size you choose for your pergola depends on what you are planning on using it for. We built our pergola with posts that were 73 1/2″ apart from inside to inside of each post. This size was large enough to fit the wooden swings in between. Too much larger than that and you risk the beam not having enough support to span the distance between the two posts, causing it to warp.
What Type of Wood Should You Use for a DIY Wood Pergola?
We used green treated lumber for our pergola. It is pressure treated with a chemical that allows it to withstand the weather.
One thing to keep in mind when using pressure treated wood. You will have to wait to paint or stain it for 6 months to a year. The wood needs to dry out before it takes any finish.
You can also use cedar, though in our experience it doesn’t always last as long as green treated lumber. It can be painted or stained right away, however, so if you are impatient to have a finished product, this might be the wood for you.
Want to remember this tutorial later? Save it to your favorite DIY board on Pinterest.
Want More Great Ideas? You Might Like These..


Are we friends on Instagram?
Follow @PracticalWhimsyDesigns to see more
behind the scenes projects