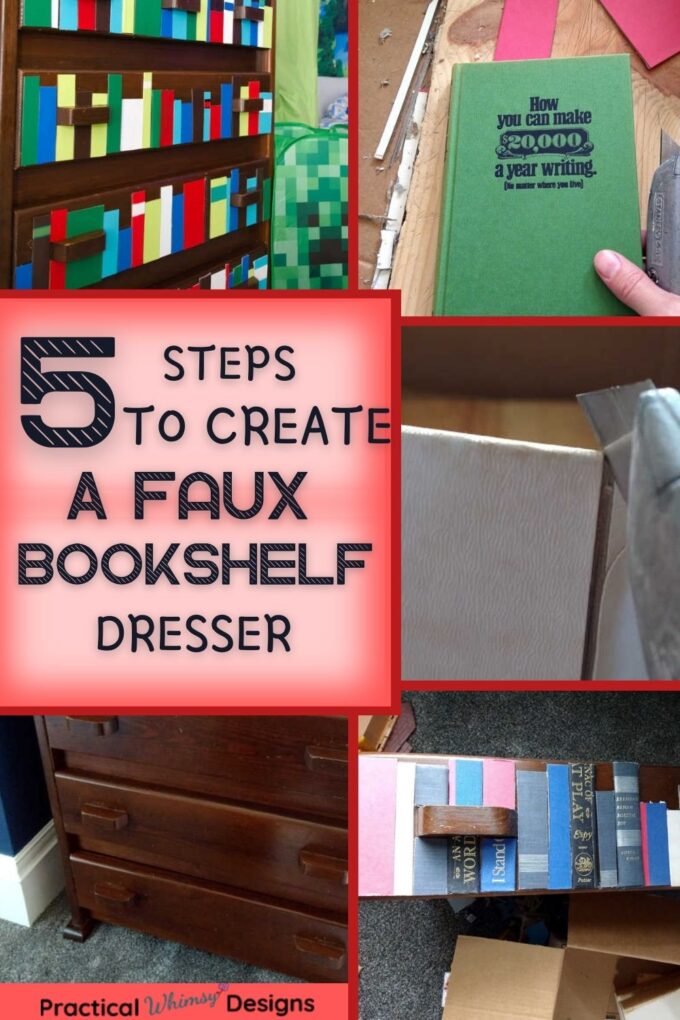
Looking for a budget dresser DIY makeover? Learn how to create a DIY Dresser Faux Bookshelf with this fun tutorial.
Our fixer upper home has been a crazy adventure, but each space that we complete allows us to create an area that feels like home. And it has been important for us to create a space that fits our kid’s likes and personalities as well.
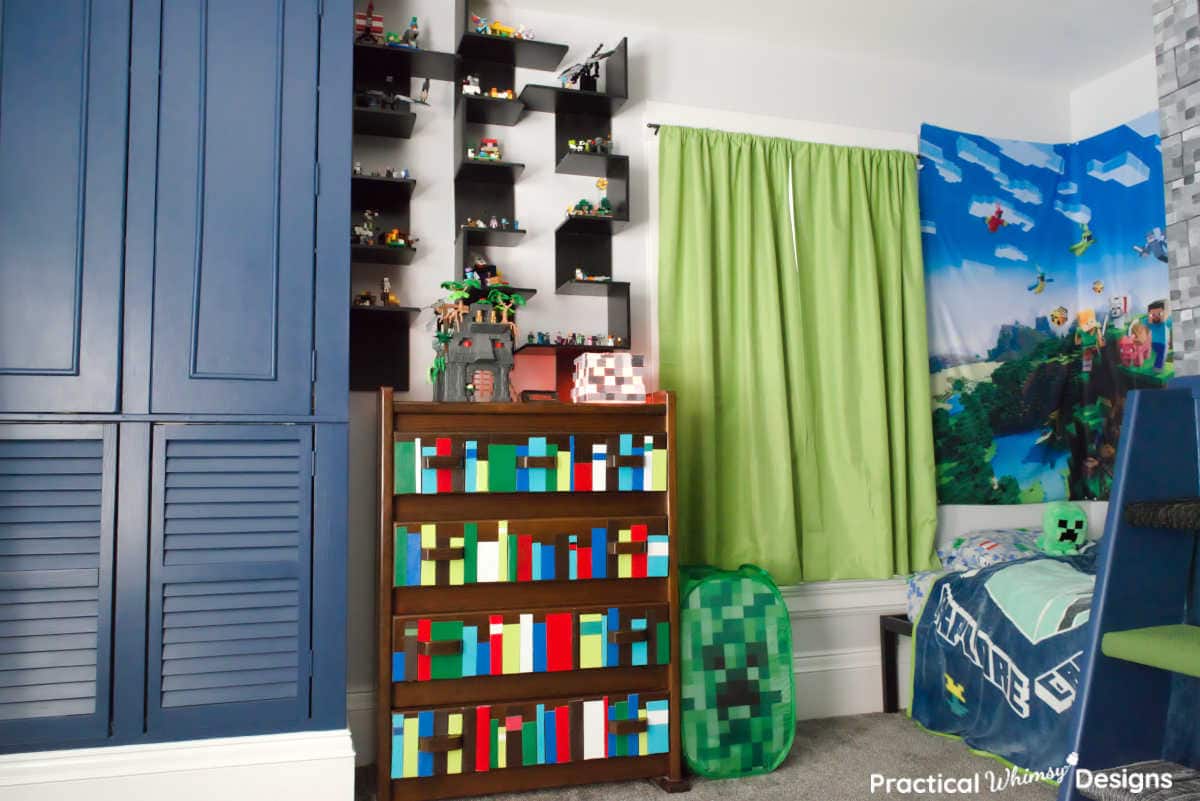
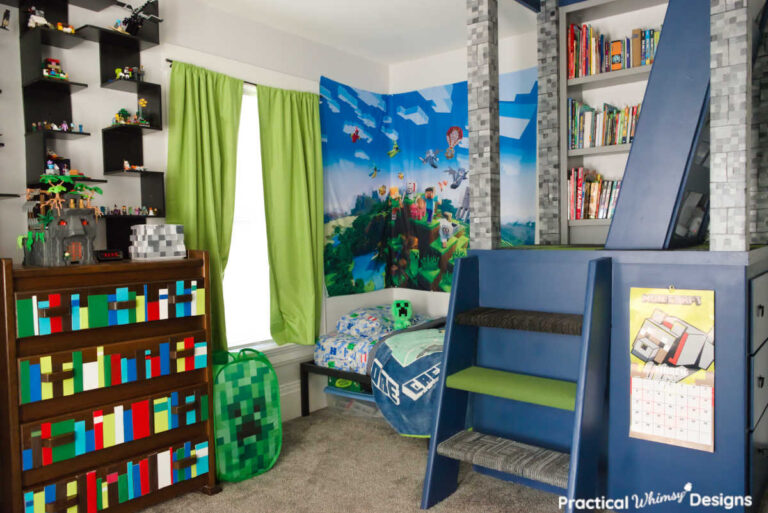
When we started remodeling our boy’s bedroom, they really wanted a themed bedroom design.
They love video games, and especially enjoy Minecraft, so we set out to create a video game themed bedroom.
To create the bedroom decor we mixed purchased items with fun DIYs to create a video game experience when you enter their room.
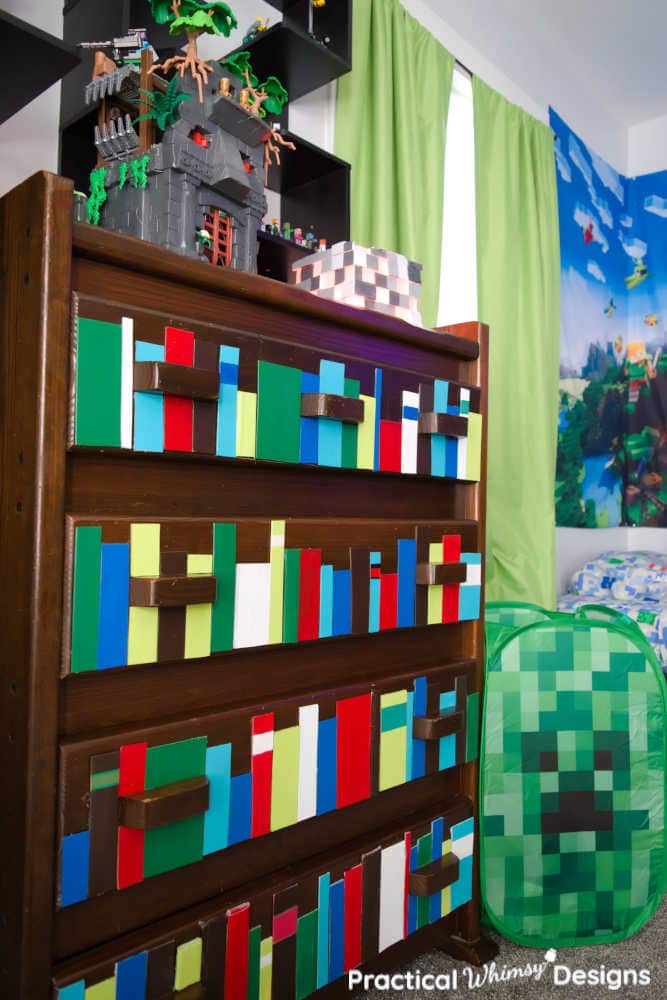
This DIY dresser makeover was one of my favorite aspects of their bedroom and allowed us to transform their ordinary old dresser into a bright and fun piece of furniture that completely fits their new space.
This post contains some affiliate links for your convenience (which means if you click a link and make a purchase I will earn a small commission at no extra cost to you). Please see my disclaimer page for more information.
DIY Dresser Makeover Into a Faux Bookshelf
Materials Needed
- Old dresser in need of a makeover
- Stain markers or paint (optional)
- Wood putty (optional)
- Old hardcover books (You will only be using the cover and you will be cutting it into pieces, so make sure it isn’t a fun and interesting book). Look for these at thrift stores or garage sales.
- Utility Knife
- Safety gloves and goggles
- Hot glue gun and glue sticks
- Sandpaper
- Painter’s tape
- Scissors
- Spray paint in a variety of colors. Below are the different colors of spray paint I used.
Steps for Your Dresser DIY Makeover
Whether you find your dresser at a thrift shop, garage sale, or you want to transform a furniture piece you already have, this is the step-by-step process to change your dresser into a fun faux bookshelf.
Step 1: Prepare Your Dresser
How you prep your furniture will depend on what look you are going for. If your dresser needs a little work, the two easiest updates are listed below.
1 – How to Touch Up Furniture with a Stain Marker
If you have a piece of furniture that is already stained, but needs a few scratches filled in, you can use stain markers that will help cover any obvious scratch marks.
To use a stain marker, start with the lightest shade of stain marker that you have and gently color in the scratch in the direction of the wood grain on your dresser. Keep applying the markers, moving from the lightest shade to the darkest, until you find the one that is the right color and blends the best with your existing stain.
Fill any larger scratches in the dresser with wood putty before applying the stain markers.
In our case, I was looking for a darker dresser to simulate a bookshelf.
We already owned this solid wood dresser with a dark stain finish and though it had a few scratches, it was the prefect look I was going for to create the faux bookshelf for my boy’s room.
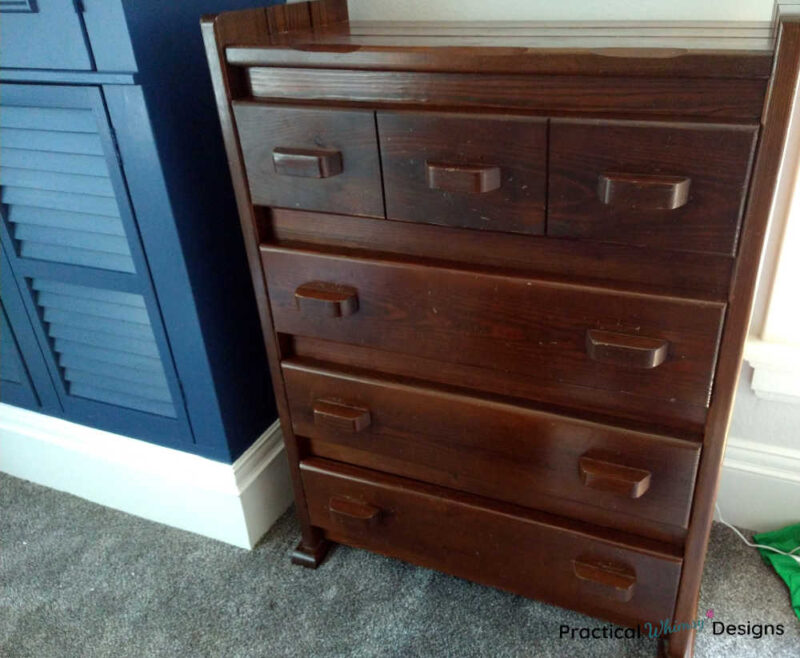
I did take a stain marker and filled in a few of the scratch marks before adding the faux books on my dresser.
2 – How to Paint the Dresser
If you happen to have a dresser that is a light color and you would like to create the same look, you can paint it a different color.
Use a paint brush and primer to paint the dresser. Next, sand the primer and then add 2-3 light coats of paint to your dresser in the color of your choice, until you achieve the dark color you are looking for. You can use this painting method to get a smooth paint finish on a dresser, even when using a paint brush.
Allow it to dry completely before moving on to the next step.
Step 2: Gather Your Books
You will need hardcover books to create the faux book ends for the drawer fronts on your dresser. The best place to purchase these items is at a thrift store.
Faux leather books work better than cloth bond books if you are planning to paint them a different color. However, I did use a mixture of both. I just had to add a second coat of paint to the cloth books.
How Many Books Will You Need for Your Book Shelf Dresser?
The amount of books you need will depend on the look you want.
If you are looking for a more vintage, realistic book shelf look and you are not planning on painting the books, you will need to use only the spine of the book. That means you will need enough books to fill the drawer fronts of each of your dresser drawers.
The number of books will be based off of the length of your drawer as well as the width of the books you have.
If you are planning to paint your books to create a more cartoon or video game look, you can use the entire book cover and will need a lot less books.
Step 3: Create Your Faux Books
Set up an area where you can cut the books apart, using a utility knife. I set up a board I could cut on.
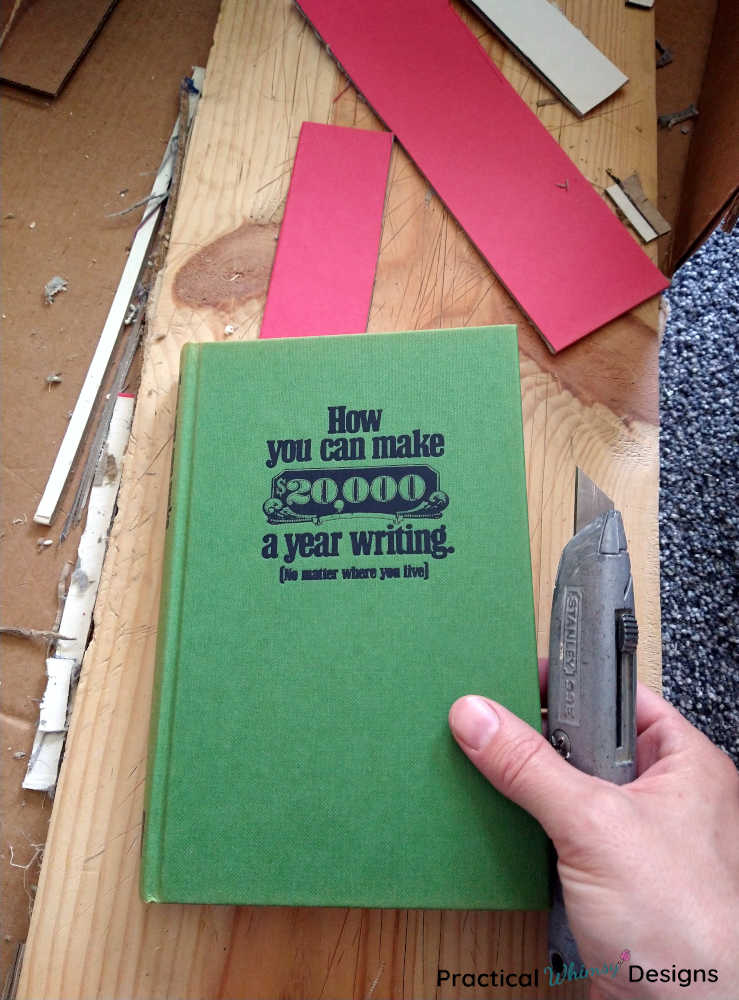
Make sure to use appropriate safety gloves and glasses.
Start by opening the book and cutting the paper insides away from the cover.
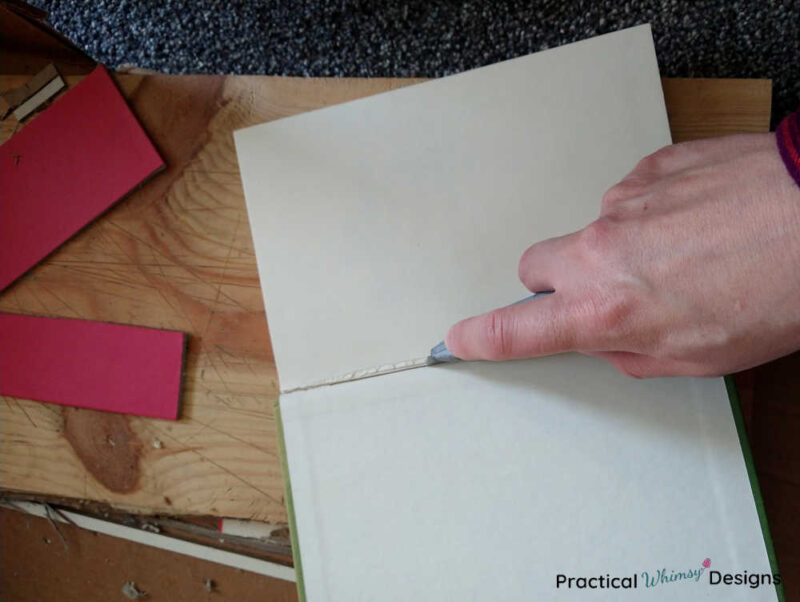
Flip the book around to the outside and carefully cut the spine portion away from the cover of the book.
The spine of the book tends to not be very strong. To add a little strength to the book spine, cut chunks of the book covers to fit inside the spine and give it support. Use a hot glue gun to glue the pieces of cover into your spine.
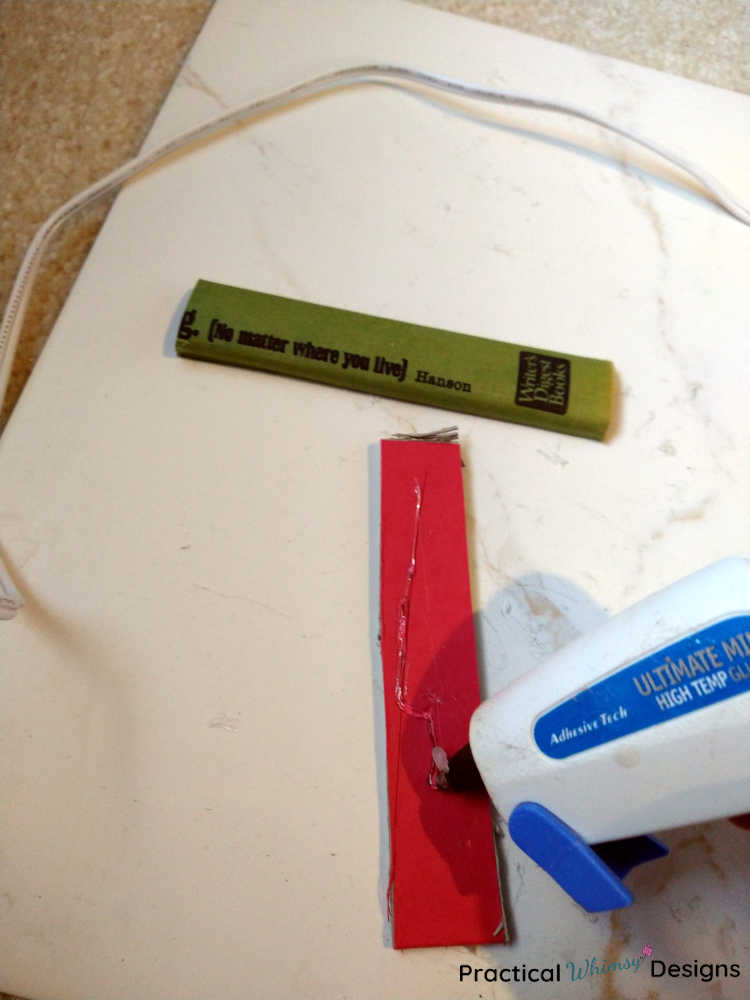
If you plan to only use the spines of the books, repeat the process above until you have enough books for your drawer fronts. If you are going to paint the books, you can cut the book covers into strips of varying heights and widths. These will act as the spines of the books on your faux shelf.
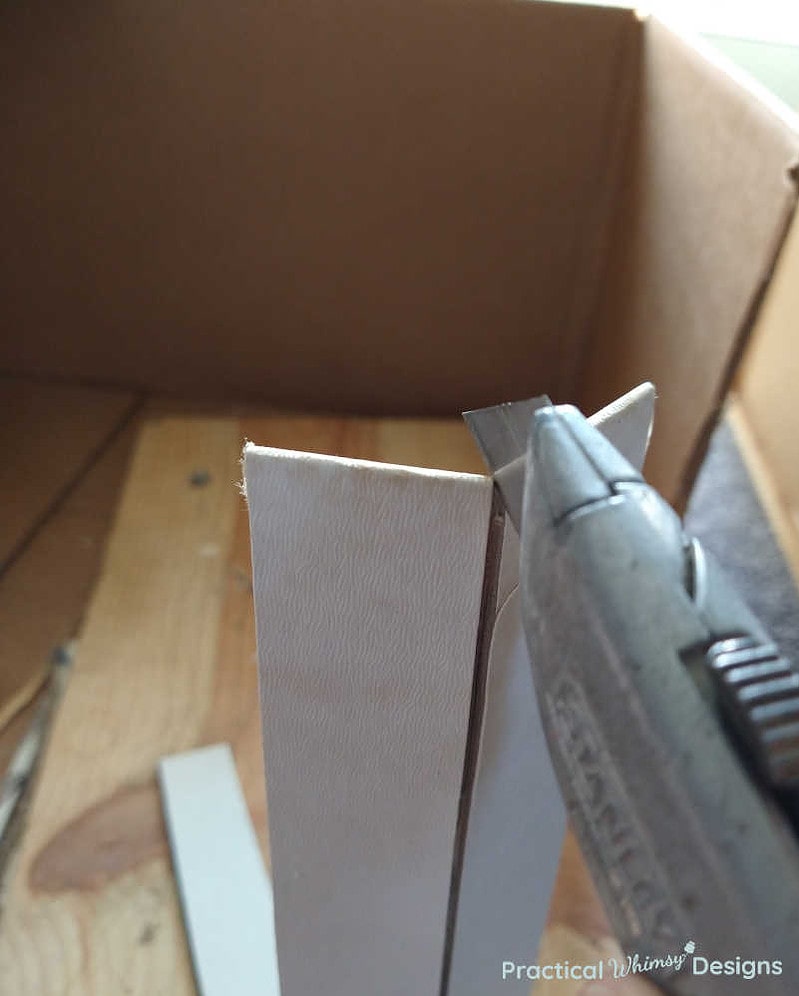
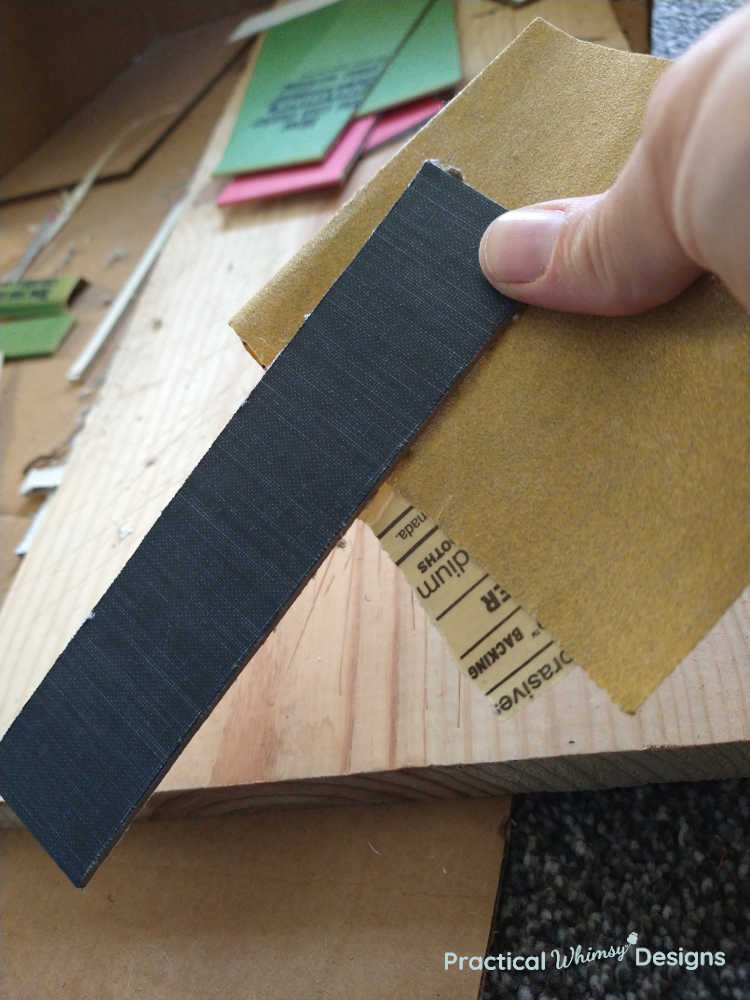
If the edges of your books are a little rough after you cut them, use a piece of sand paper to carefully smooth the edges.
Tip: Take each drawer of your dresser out and place them so that you can lay the faux books on top as you cut them out. This will help you know when you have enough and allows you to see the height variance as you go.
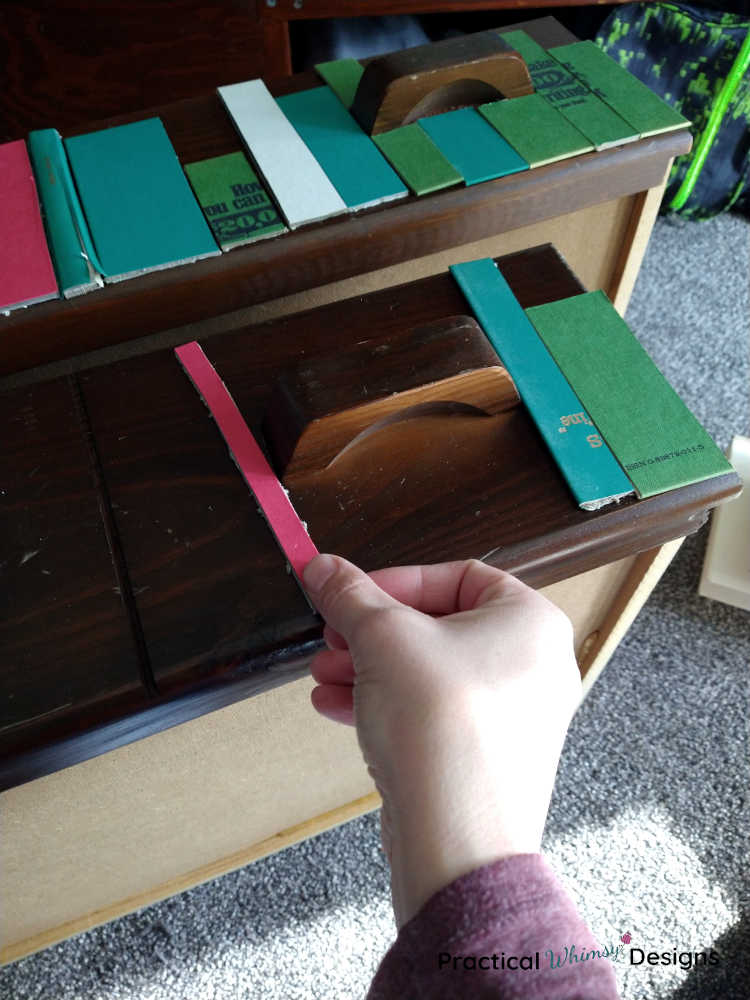
You will need to work around the drawer pulls on your dresser. Since my built in handles didn’t allow for new hardware, I incorporated my handles into the books by adding a chunk of book below and above the handle. Since I was planning to paint the books, I only had to make sure the books were the same width.
Step 4: Paint Your Books
If you aren’t painting your faux books, you can skip to step 4.
For those wishing to add a new color and fresh coat of paint to each book, follow this step.
Use a large piece of cardboard or plywood sheet to carefully lay your book spines in order. Only place the spines for one dresser drawer on the board so you don’t get them mixed up.
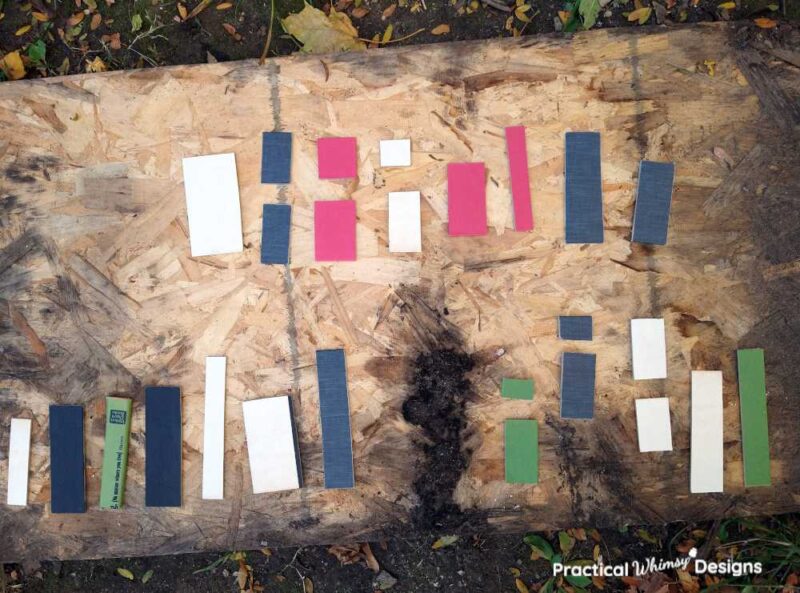
Make sure there is enough room so that you can spray paint each book with out getting over spray onto the book next too it.
Always spray paint in a well ventilated area.
If you want to keep any of the original book color as an accent color, use a scissors to cut a piece of painter’s tape to create a strip across the spine.
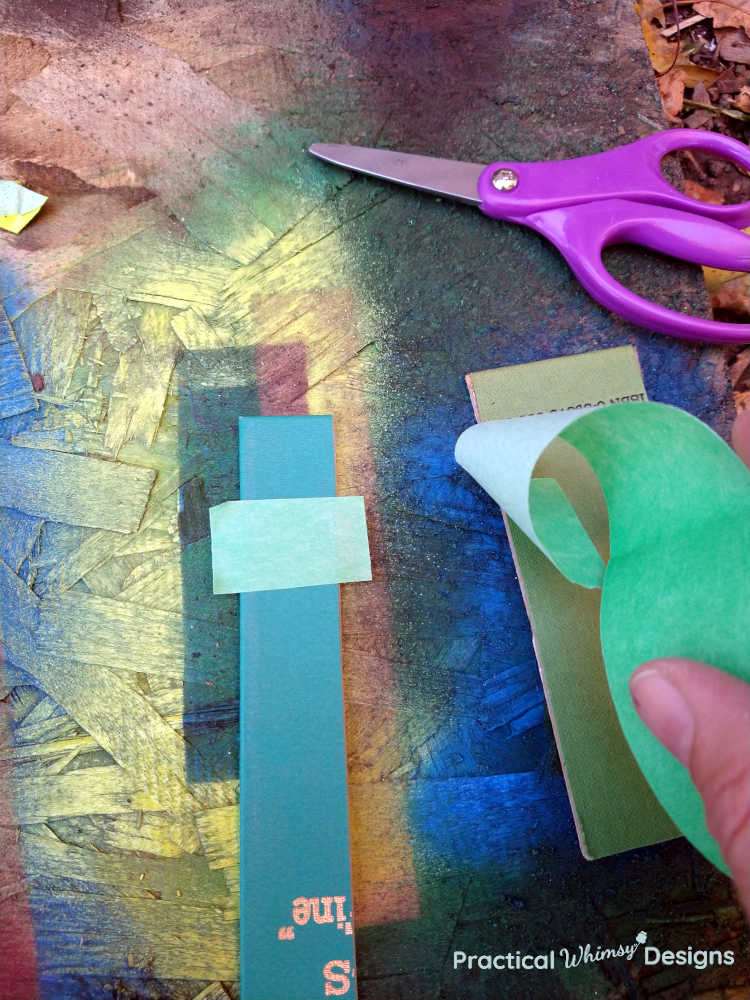
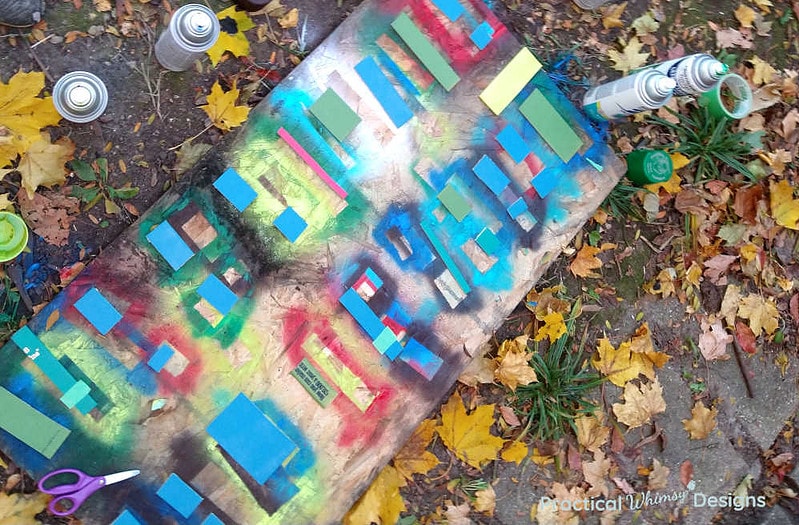
Then grab the colored spray paint you want for your book’s spines.
Since our books were meant to add a pop of color to the room, we used bold colors (see the materials used section at the top of this post for a list of the colors I used). I tried to stagger each paint color so that there was a variety of different paint colors throughout each dresser drawer front. I didn’t want it to look too uniform.
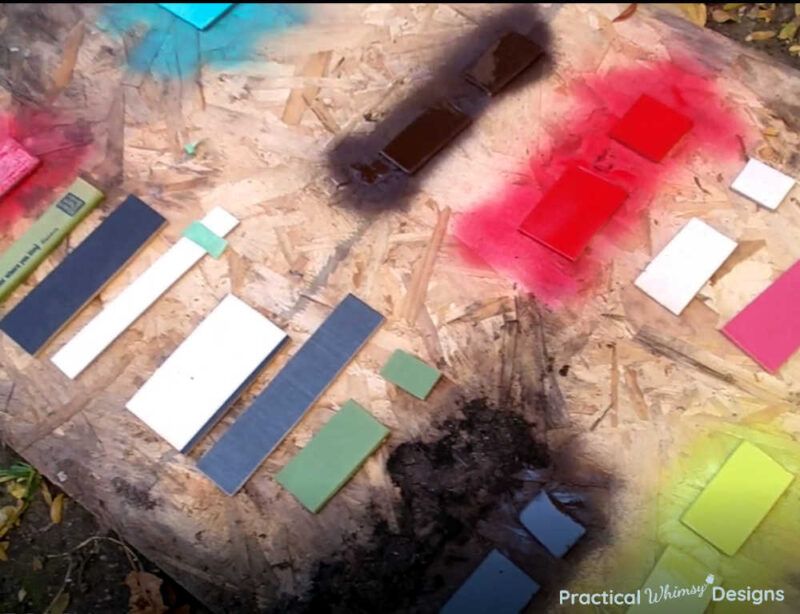
Allow the faux books to dry.
If you notice that the paint doesn’t have great coverage, add another coat.
Note: The fabric covered books tended to be the books that I needed to add another coat to.
Remove the painter’s tape, if you added any to your books.
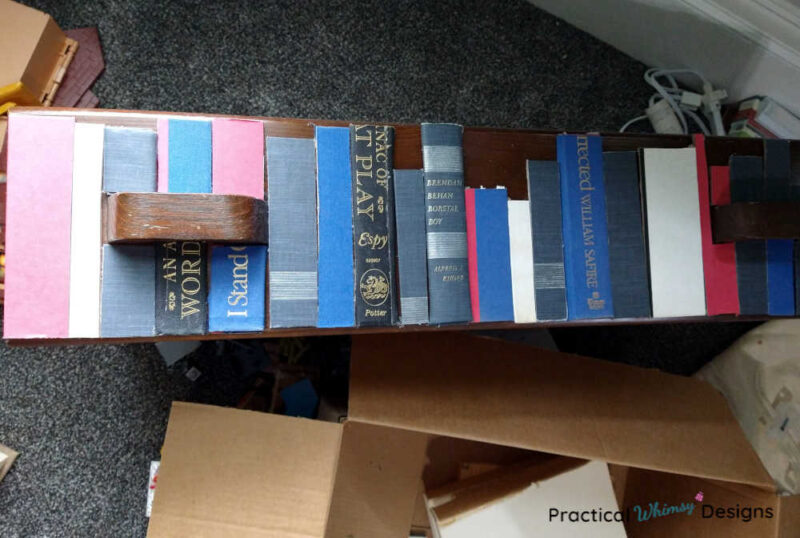
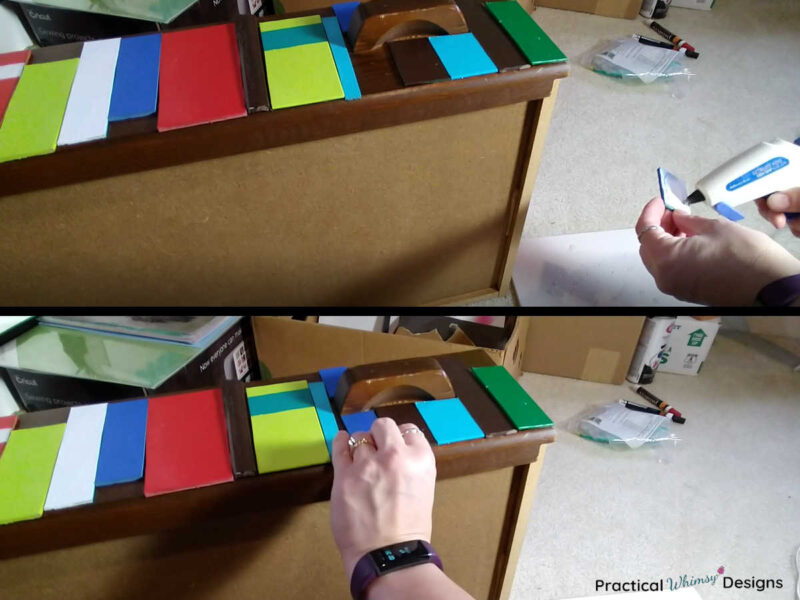
Step 5: Attach Your Books To The Dresser
Now that your book spines are ready, you will need to glue them on to your dresser.
I used a hot glue gun to glue each spine on to the front drawer. I found it was the easiest way to secure the books to the dresser, because it doesn’t take much time to dry and I was able to add the books to the entire dresser drawers in one sitting. You could also use wood glue, but you would have to allow for dry time and keep the dresser drawers in a secure place until the glue was secure.
Display Your Faux Book Shelf Dresser
Once everything is dry, reassemble the drawers and place your finished product in your room.
I love how the book ends give my old furniture a completely new look.
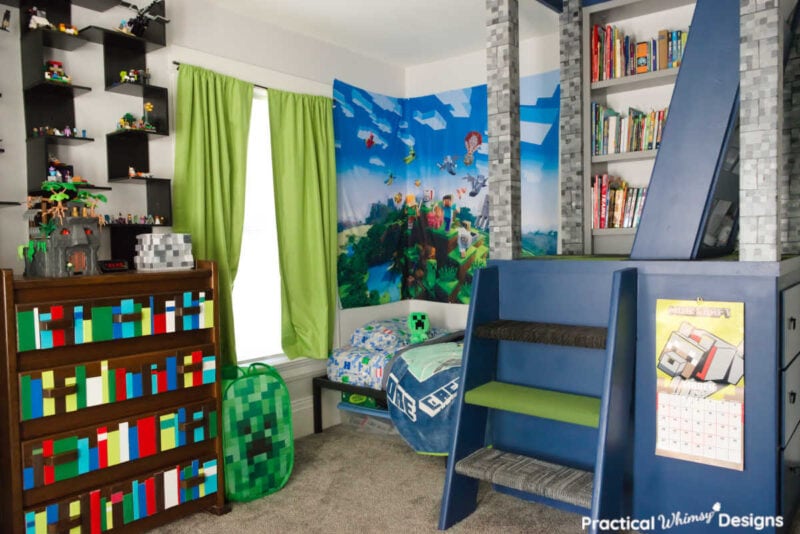
If you are in search of fun diy dresser ideas for a themed room or you want to create a more modern look in a bedroom, a diy dresser makeover is an easy way to add new life to old furniture.
In the case of my boy’s bedroom, this became the perfect dresser to tie in their theme in their video game bedroom.
The fresh paint on the faux books was a great way to add an easy DIY project to my kid’s room. The best part was, it was cheap because I was able to use old books I found in our home when we moved in.
Want to remember this idea? Save it to your favorite DIY Pinterest board.
Want More Great Ideas? You Might Like These..


Are we friends on Instagram?
Follow @PracticalWhimsyDesigns to see more
behind the scenes projects